


Easy, but I always forget:
= (ROUND((A1 * 1440) / 15, 0) * 15) / 1440
–jeroen
via datetime – Round time to nearest 15min interval in Excel – Stack Overflow.
Posted by jpluimers on 2016/10/14
Easy, but I always forget:
= (ROUND((A1 * 1440) / 15, 0) * 15) / 1440
–jeroen
via datetime – Round time to nearest 15min interval in Excel – Stack Overflow.

Posted in Excel, Office, Power User | Leave a Comment »
Posted by jpluimers on 2016/10/10
Sometimes you don’t recognize how easy it is until you see it:
Add a column that is of type date with value =FLOOR(A2,1) .Then Insert -> Pivot Table. Then drag the date column on the right into the Rows box, and also drag it into values box. Done.
Thanks David d C e Freitas!
via How to group by date in excel? – Super User.
Posted in Excel, Office, Power User | Leave a Comment »
Posted by jpluimers on 2016/09/05
Unlike most applications where F3 is search next, Office has their own thought about keyboard shortcuts.
So in Word for Windows, you can use these:
–jeroen
via:
Posted in Keyboards and Keyboard Shortcuts, Office, Power User, Word | Leave a Comment »
Posted by jpluimers on 2016/08/01
Oh man, why didn’t they make a line object out of this…
But if you realize it is a bottom border, then deleting is easy:
The answer is something of a trick, as the horizontal line is not a line (or a graphic), it’s a bottom border.
–jeroen
via: Deleting Horizontal Lines From Word.
Posted in Office, Office 2007, Office 2010, Office 2013, Power User | Leave a Comment »
Posted by jpluimers on 2016/07/18
Coming from an Office pre 2000 background, I’m still amazed at how will things are hidden in modern Office versions.
Take the page numbers not showing on slides – Microsoft Community.
I bumped into that recently as well on a new blank presentation:
You see the placeholders at design time, but they don’t show up at presentation time.
The obvious action for me: Right click on each to see if there is anything about special formatting or hiding. It doesn’t work.
What does work is to:
–jeroen
via: PowerPoint 2013: Date, Slide Number and Footer | Academic Technology @ Palomar College.

Posted in Office, Office 2007, Office 2010, Office 2013, Power User | Leave a Comment »
Posted by jpluimers on 2016/05/23
Sometimes people give you .msg files saved from Outlook instead of forwarding those mails by e-mail.
Opening a .msg file requires Outlook.
You don’t need to bind Outlook to an e-mail account for this (so you can skip those steps when asked the first time Outlook opens). An Office installation that includes Outlook suffices.
After opening the message:
For some HTML messages, “View Source” is not available. I’m not yet sure why.
–jeroen
via: How can I view the entire source code of an email in Outlook 2010? – Super User
Posted in Office, Office 2010, Office 2013, Office 2016, Outlook, Power User | Leave a Comment »
Posted by jpluimers on 2016/03/25
Apart from the obvious “use less tables” and “break tables apart”, these can also help big time:
If it is still too slow, I might look into these:
–jeroen

Posted in Microsoft Surface on Windows 7, Office, Office 2007, Office 2010, Office 2013, Power User, Windows, Windows 7, Windows 8, Windows 8.1, Windows 9, Windows Server 2008, Windows Server 2008 R2, Windows Server 2012, Windows Server 2012 R2, Windows Vista, Word | Leave a Comment »
Posted by jpluimers on 2015/12/07
Showing message headers and source used to be easy in early Outlook versions.
But as of Outlook 2007 they hid the internet message headers even further away than in Outlook 2003.
Steps for Outlook 2007+:
Same for the message source:
–jeroen
via:
Posted in Office, Office 2003, Office 2007, Office 2010, Office 2013, Outlook, Power User | Leave a Comment »
Posted by jpluimers on 2015/11/20
You can’t: How can I combine multiple nested Substitute functions in Excel? – Stack Overflow.
Posted in Excel, Office, Office 2007, Office 2010, Office 2013, Power User | Leave a Comment »
Posted by jpluimers on 2015/11/19
I bumped into a #DIV/0! result for average functions when processing large sets of data.
It is actually very easy to spot the error in small results, sets, but hard in big ones, as you cannot see the #DIV/0!
So there are average functions that can ignore certain outcomes. COUNT already does that (there is no COUNTIF), the others have a *IF equivalent, but not in all Excel versions:
Note there is a small SUMIF/SUMIFS/AVERAGEIF/AVERAGEIFS in Excel 2010 (not in 2007, and maybe not in 2013) glitch when the criteria are in a different sheet.
The seemingly easy workaround of summing columns A and B, then doing the division fails: it returns different results as it forgets to ignore faulty rows:
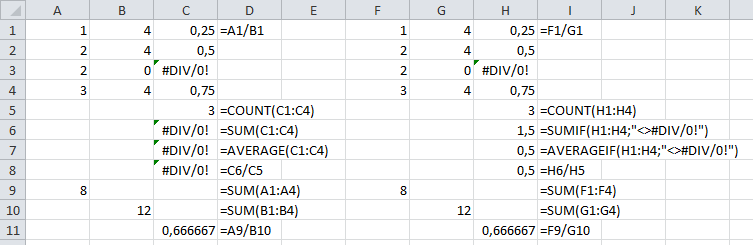
SUM/AVERAGE versus SUMIF/AVERAGEIF (click to enlarge)
Leermomentje (techable moment comes close)…
–jeroen
via:

Posted in Development, Excel, Office, Office 2003, Office 2007, Office 2010, Office 2013, Power User, Software Development | 2 Comments »
