The Wiert Corner – irregular stream of stuff

Jeroen W. Pluimers on .NET, C#, Delphi, databases, and personal interests

  • My badges

  • Twitter Updates

  • My Flickr Stream

  • Pages

  • All categories

  • Enter your email address to subscribe to this blog and receive notifications of new posts by email.

    Join 1,860 other subscribers

Archive for the ‘Hardware Interfacing’ Category

Good tips for powering any kind of LED strips from the Adafruit NeoPixel Überguide | Adafruit Learning System

Posted by jpluimers on 2020/10/22

Read these tips before playing with any kind of LED strips: [WayBack] Powering NeoPixels | Adafruit NeoPixel Überguide | Adafruit Learning System.

There are more, but these are the most important:

  • When connecting NeoPixels to any live power source or microcontroller, ALWAYS CONNECT GROUND (–) BEFORE ANYTHING ELSE. Conversely, disconnect ground last when separating.
  • Adding a 300 to 500 Ohm resistor between your microcontroller’s data pin and the data input on the first NeoPixel can help prevent voltage spikes that might otherwise damage your first pixel. Please add one between your micro and NeoPixel.
  • Before connecting a NeoPixel strip to ANY source of power, we very strongly recommend adding a large capacitor (1000 µF, 6.3V or higher) across the + and – terminals. This prevents the initial onrush of current from damaging the pixels.
  • Be extremely cautious with bench power supplies. Some — even reputable, well-regarded brands — can produce a large voltage spike when initially switched on, instantly destroying your NeoPixels!
    If you use a bench supply, do not connect NeoPixels directly. Turn on the power supply first, let the voltage stabilize, then connect the pixels (GND first).

Via: [WayBack] Bouw je eigen ledtafel – Tot slot – Achtergrond – Tweakers

–jeroen

Posted in Arduino, Development, Hardware Development, Hardware Interfacing, Raspberry Pi | Leave a Comment »

Remote power control your IoT hardware and remote updating boot SD cards

Posted by jpluimers on 2020/07/16

Thomas Rini (of U-Boot and Yocto fame) mentioned these solutions for remote power control of IoT devices and remote updating SD cards in this slide State of the U-Boot – Thomas Rini, Konsulko Group:

Two power solutions I like myself are:

The combination of these allows for really flexible production and testing environments.

Slides at [WayBackELC2017 – State of the U-Boot.pdf

–jeroen

Read the rest of this entry »

Posted in Arduino, Development, ESP8266, ESP8266X, Hardware Development, Hardware Interfacing, IoT Internet of Things, Network-and-equipment, Odroid, Power User, Raspberry Pi | Leave a Comment »

GitHub – dschmenk/apple2pi: Apple II client/server for Raspberry Pi

Posted by jpluimers on 2020/05/28

[WayBack] GitHub – dschmenk/apple2pi: Apple II client/server for Raspberry Pi: hybrid computer of a Raspberry Pi inside an Apple II (either ][, or ][+, or //e) so the Apple II can be a front-end to the Raspberry Pi which then can run an Apple IIGS emulator, talk to the Apple II storage hardware and much more.

It can run [WayBack] RASPPLE II: A2CLOUD, A2SERVER, Apple II Pi for Raspberry Pi

Lot’s of videos below, all by David Schmenk https://www.youtube.com/user/dschmenk/videos

Via:

–jeroen


Posted in *nix, *nix-tools, //e, 6502, Apple, Apple ][, Development, Hardware Development, Hardware Interfacing, History, Power User, Raspberry Pi, USB | Leave a Comment »

PC to TV HDMI image too large for screen – [Solved] – Graphics Cards

Posted by jpluimers on 2020/03/23

Someone Somewhere said:

It’s a setting in the TV. Look for terms like ‘overscan’ , ‘pixel perfect’, ‘1:1’, or similar. Usually under the HDMI settings for that input.

In my case (my mother’s Samsung), the original setting was 16:9 which failed. What works is screen fit. Go figure.

Source: [WayBackPC to TV HDMI image too large for screen – [Solved] – Graphics Cards

–jeroen

Posted in Development, Hardware Interfacing, HDMI, Power User | Leave a Comment »

Use PiServer to easily set up a network of client Raspberry Pi clients connected to a single x86-based server via Ethernet.

Posted by jpluimers on 2020/01/07

On my list of things to try:

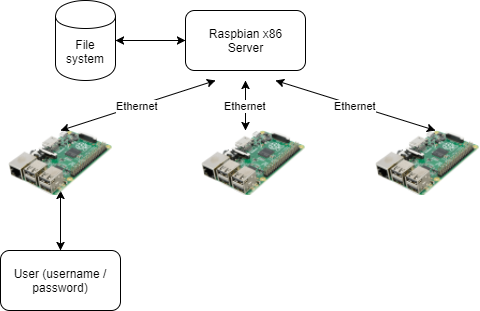
PiServer is our new piece of software that makes it easy to create a network of Pis you can centrally control — ideal for your computing classroom or club!
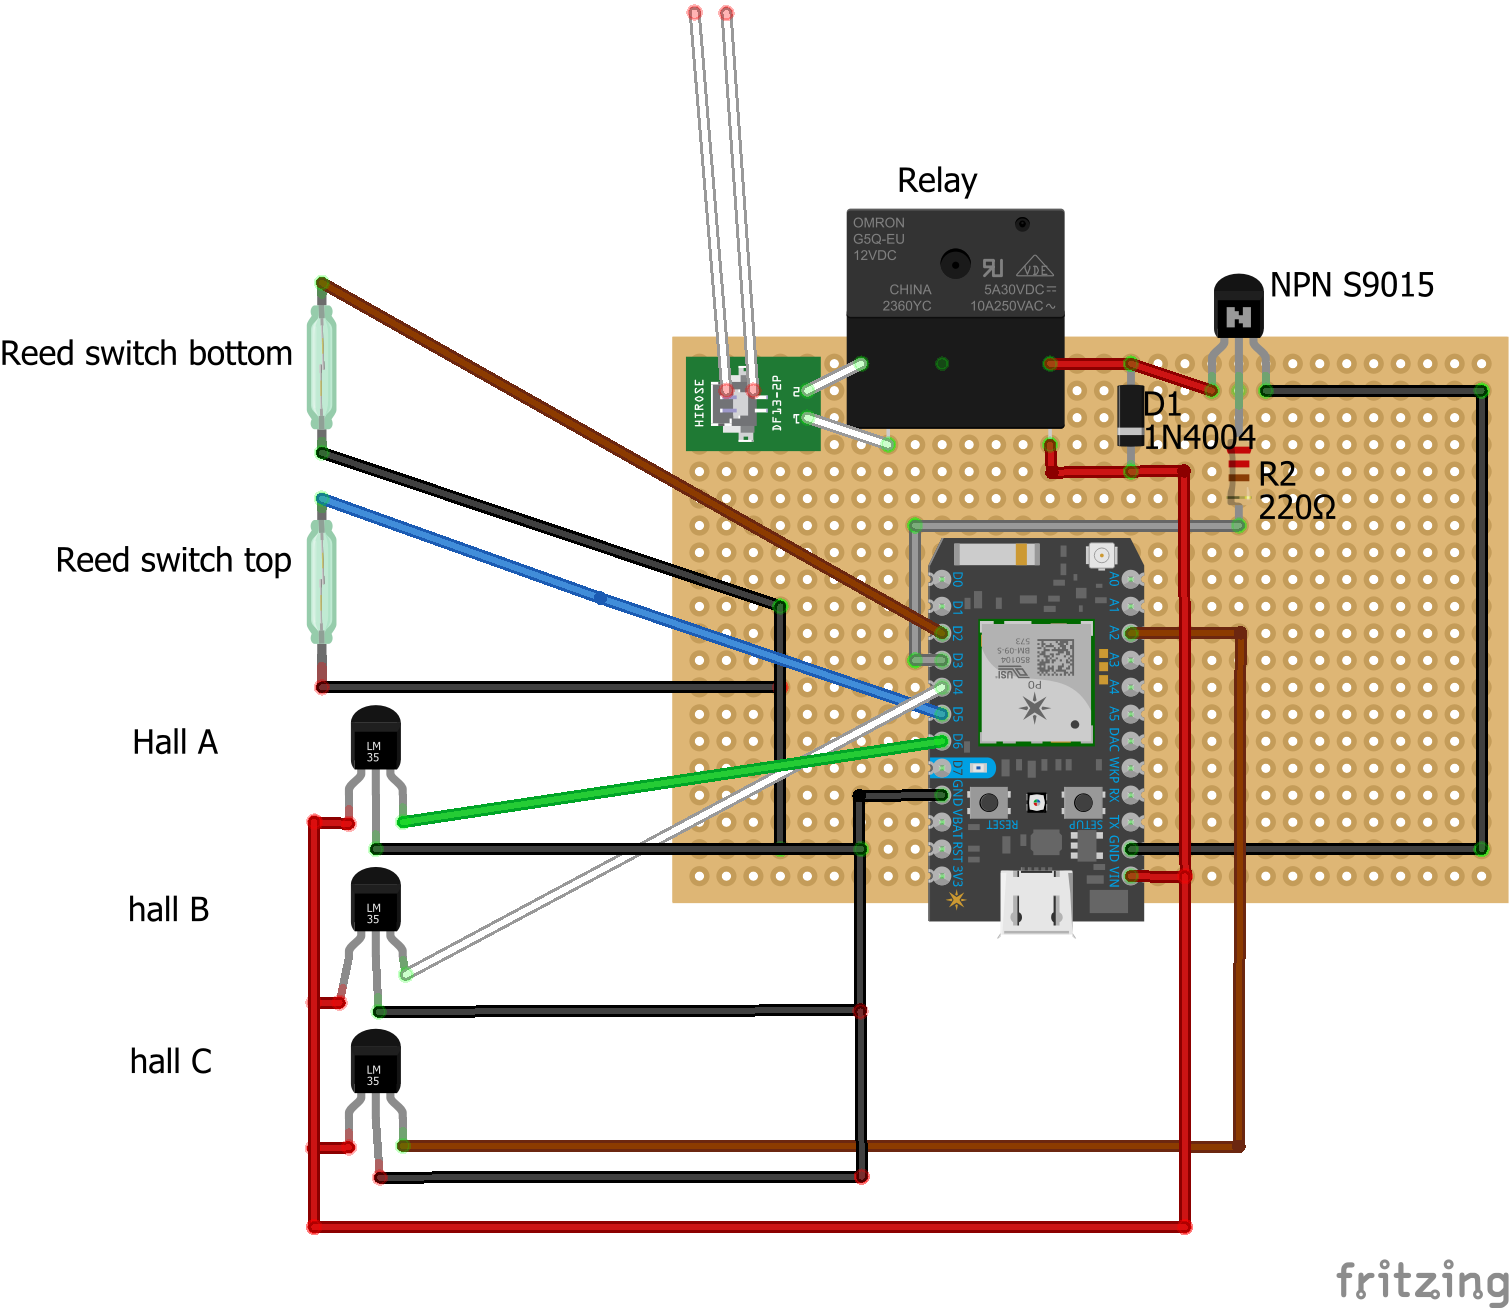
Source: [WayBack] The Raspberry Pi PiServer tool – Raspberry Pi

Via: [WayBack] Use PiServer to easily set up a network of client Raspberry Pis connected to a single x86-based server via Ethernet. With PiServer, you don’t need SD card… – Raspberry Pi – Google+

–jeroen

Posted in Development, Hardware Development, Hardware Interfacing, Raspberry Pi | Leave a Comment »

Brilliant device: iPazzPort Wireless Mini Handheld Keyboard with Touchpad Mouse Combo for Android TV Box and Raspberry Pi 3 and HTPC and XBMC KP-810-19S – Black: Computers & Accessories

Posted by jpluimers on 2020/01/03

Brilliant device: [WayBack] KP-810-19BTT Mini Bluetooth Keyboard with touchpad – Unisen Group iPazzPort

I got it via Amazon USA ([WayBack] iPazzPort Wireless Mini Handheld Keyboard with Touchpad Mouse Combo for Android TV Box and Raspberry Pi 3 and HTPC and XBMC KP-810-19S – Black: Computers & Accessories), but Amazon in Europe has it as well (this is the German link:[Archive.isiPazzPort Mini Wireless Handheld Tastatur mit Touchpad: AmazonSmile: Computer & Zubehör; replace .de with .fr, .co.uk, to find your local link).

There are this one is 2.4 Ghz, includes a USB dongle in the battery compartment and requires 2 AAA batteries.

There are Bluetooth and back-lit versions too which cost slightly more.

Via: [WayBack] Raspberry Pi Cluster – Software Team Lead

–jeroen

Posted in Development, Hardware Interfacing, Keyboards and Keyboard Shortcuts, Power User, USB | Leave a Comment »

Idea: managing a garage door with a modified Marantec switch, some sensors and Raspberry Pi

Posted by jpluimers on 2019/12/24

Some links to get this idea going, incomplete, as I have not yet included Domoticz or OpenHAB links:

I will likely need:

  • some optocouplers to decouple GPIO pins from the Marantec switch and sensors
  • sensors for detecting current state: open/closed/opening/closing/obstructed

Warning on selecting GPIO pins:

When the Raspberry Pi reboots GPIO pins are reset to their default state. This can cause your garage door to open without you issuing a command. Please make sure you pick the correct pins so that you don’t accidentally have your garage door opening after a power loss.

The following pins are pulled HIGH (they output a 3.3 volt signal) on reboot:

  • GPIO0/2
  • GPIO1/3
  • GPIO4
  • GPIO7
  • GPIO8

GPIO14 is configured as a Serial Transmit line, so avoid choosing that pin.

All other pins are pulled LOW (they have a 0 volt signal, same as GND).

If your relay triggers when the GPIO pin goes LOW, then pick a pin that starts out HIGH on reboot. If your relay triggers with the GPIO PIN goes HIGH then pick a GPIO pin that starts out LOW on reboot.

–jeroen

Posted in Development, Hardware Development, Hardware Interfacing, Raspberry Pi | Leave a Comment »

(53) Introducing the “Lab in a Box” Concept – Patrick Titiano & Kevin Hilman, BayLibre – YouTube

Posted by jpluimers on 2019/08/13

Related: Introducing The “Lab in a Box” Concept (ELC-E-2017-Prague).pdf

Via:

–jeroen

Read the rest of this entry »

Posted in Development, Hardware, Hardware Development, Hardware Interfacing, Power User, Raspberry Pi, Software Development | Leave a Comment »

No IPMI? Use a Raspberry Pi to remotely control the power of your computer

Posted by jpluimers on 2019/07/12

Interesting project: [WayBack] WtRPM: A Web-based (Wt) suite to power up/down your computers – mupuf.org

It hooks a RaspberryPi to your ATX power supply.

Via: [WayBack] gpio – Use Raspberry Pi to control PC’s power switch – Raspberry Pi Stack Exchange

–jeroen

Posted in Development, Hardware Development, Hardware Interfacing, Raspberry Pi | Leave a Comment »

That duh moment when you cannot read an SD card: it’s SDHC/SDXC in an SD card reader; Secure Digital – Wikipedia

Posted by jpluimers on 2019/02/18

That moment you facepalm yourself because you forgot that particular machine won’t read SD cards because they are too big for the SD card reader in it: SD goes up to 4 gigabyte, anything bigger (nowadays basically everything) requires SDXC or SDHC compatible readers.

Quotes from Wikipedia:

However, older host devices do not recognize SDHC or SDXC memory cards, although some devices can do so through a firmware upgrade.[11] Older Windows operating systems released before Windows 7 require patches or service packs to support access to SDHC cards.[12][13][14]

Older host devices generally do not support newer card formats, and even when they might support the bus interface used by the card,[6]there are several factors that arise:

  • A newer card may offer greater capacity than the host device can handle (over 4 GB for SDHC, over 32 GB for SDXC).
  • A newer card may use a file system the host device cannot navigate (FAT32 for SDHC, exFAT for SDXC)
  • Use of an SDIO card requires the host device be designed for the input/output functions the card provides.
  • The hardware interface of the card was changed starting with the version 2.0 (new high-speed bus clocks, redefinition of storage capacity bits) and SDHC family (Ultra-high speed (UHS) bus)
  • UHS-II has physically more pins but is backwards compatible to UHS-I and non-UHS for both slot and card.[27]
  • Some vendors produced SDSC cards above 1GB before the SDA had standardized a method of doing so.
SD compatibility table
SDSC card SDHC card SDHC UHS card SDXC card SDXC UHS card SDIO card
SDSC slot Yes No No No No No
SDHC slot Yes Yes Yes[a] No No No
SDHC UHS slot Yes[a] Yes[a] Yes[b] No No No
SDXC slot Yes Yes Yes[a] Yes Yes[a] No
SDXC UHS slot Yes[a] Yes[a] Yes[b] Yes[a] Yes[b] No
SDIO slot Varies Varies Varies Varies Varies Yes

–jeroen

Posted in Development, Flash-memory, Hardware Interfacing, Power User, SD/miniSD/microSD/MMC, Storage, USB | Leave a Comment »