Archive for the ‘MacBook’ Category
Posted by jpluimers on 2022/03/14
After years of use, the cooling fans of my 15-inch Retina MacBook Pro 2015 model got quite a bit dirty, causing them to run louder and louder.
The video below the fold shows how to clean them: 11 screws, some isopropyl alcohol, (dry!) compressed, and caution for the connector-clips connecting the bottom plate.
It helps having a:
- pentalobe P5 screwdriver
- plastic spudger so separate the bottom plate (especially be careful with the connector-clips)
- magnet to stick the screws to, as they are really tiny and it is easy to loose them
I got the pentalobe screwdriver with some spare screws from the German Amazon: [Archive.is] Kricson Ersatzschrauben MacBook Pro – 4 Pack Gummi: Amazon.de: Computer & Zubehör
You can get a similar one from the USA Amazon site: [Archive.is] Amazon.com: 8 Pack Rubber Case Feet + Set of 20pcs Repair Replacement Screw + 1pcs 5 Point Pentalobe Screwdriver for Unibody MacBook Pro Retina A1425 A1502 A1398 13″ 15″ Bottom Case(Retina): Computers & Accessories
Two important tips:
- After using isopropyl alcohol, let the parts dry
- Hold the fans when spraying compressed air (to prevent the fan-motors to create over-voltage, and to prevent the fans spinning faster than they are rated for)
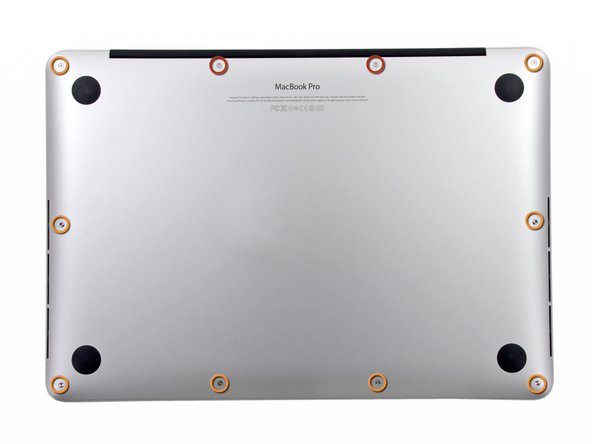
The iFixit pictures for replacing the SSD help greatly to see how to remove and re-attach the back-cover, and where the various parts are inside the machines.
Note the screws differ between the 13-inch and 15-inch models!
–jeroen
Read the rest of this entry »
Posted in Apple, Mac, MacBook, MacBook Retina, MacBook-Air, MacBook-Pro, Power User | Leave a Comment »
Posted by jpluimers on 2022/01/21
Since dd on Apple does not support progress parameters via [Wayback] macos dd progress – Google Search:
- [Wayback] Quick: dd with progress indication on macOS
A nice way I found to get progress indication whilst still being able to benefit from the huge speed increase in using /dev/rdiskX is to install a tool called pv, also known as [WayBack] Pipe Viewer.
Example:
sudo dd if=/dev/rdiskX bs=1m | pv -s 64G | sudo dd of=/dev/rdiskY bs=1m
Another way to achieve something similar would be to use brew to install coreutils, which will come with a newer version of dd that supports the status option.
Example:
gdd if=/dev/diskX of=/dev/diskY bs=1m status=progress
- [Wayback] el capitan – How can I track progress of dd – Ask Different
You just need to enter a controlT character from the keyboard while the dd command is executing.
By pressing the controlT character, you are sending the same SIGINFO signal to the dd command that the command pkill -INFO -x dd sends.
dd itself doesn’t provide a progress bar. You may estimate the progress of the dd copy process by adding a pkill -INFO command though.
Example:
dd if=/dev/zero of=/dev/null bs=64m count=1000 & while pkill -INFO -x dd; do sleep 1; done
- [Wayback] dd progress indicator on OSX
signal siginfo is coupled to key-combination CTRL-T. No need to use kill, you can just type CTRL-T in the terminal window where dd is running.
–jeroen
Posted in *nix, *nix-tools, Apple, iMac, Mac, Mac OS X / OS X / MacOS, MacBook, MacBook Retina, MacBook-Air, MacBook-Pro, MacMini, Power User | Leave a Comment »
Posted by jpluimers on 2021/05/21
Based on [WayBack] Command-Tab Not working….. – Apple Community
If you go to Activity monitor and search for dock, doubleclick on it, choose Force quit.
It will restart the Dock app and now it should work.
I wrote this alias which restarts Dock (including Dashboard and Spaces as they are served by the same process).
alias restart-dock-dashboard-spaces='killall -KILL Dock'
Related: my 2013 post Mac: Restarting the Mac OS X Dock, Finder, Spaces or Menubar | Stefan Ernst.
–jeroen
Posted in Apple, iMac, Mac, Mac OS X / OS X / MacOS, MacBook, MacBook Retina, MacBook-Air, MacBook-Pro, MacMini, macOS 10.12 Sierra, macOS 10.13 High Sierra, OS X 10.10 Yosemite, Power User | Leave a Comment »
Posted by jpluimers on 2020/09/04
Somehow, every now and then, a 2015 Retina MacBook Pro will eject the SD Card during sleep.
I’m not sure about the cause, just about the message that a drive got unmounted in an unexpected way.
This fails to rescan for the drive on Mac OS Sierra:
sudo kextunload -b com.apple.driver.AppleSDXC

sudo kextload -b com.apple.driver.AppleSDXC
As per [WayBack] external disk – Problem with kextunload SD card remount – Ask Different, I tried the kextstat below, however, before the unload/load statements, kextstat | grep -e SDXC returns nothing.
After them, it returns something like
156 0 0xffffff7f841f3000 0x12000 0x12000 com.apple.driver.AppleSDXC (1.7.6) 0F6F5025-A1C4-3E77-9ECD-4D4410E684C5 <16 15 12 5 4 3 1>
When it happens again, I will likely need to read these:
It might be that somewhere along the line, SDSX is not started by default any more or not applicable to MicroSD to SDXC card converters. These screenshots at least show that this disk is connected via a USB path:
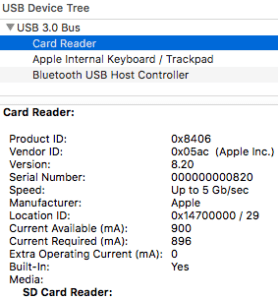
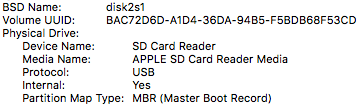
The screenshots are from the stock “System Information.app” tool, and I really wish it showed the kext drivers used for each device. That would make debugging these issues a lot easier!
A solution then could be as easy as this:
Unmount all USB connected devices (for instance with a command like diskutil eject disk1);
sudo kextunload -b com.apple.driver.AppleUSBCardReader

sudo kextload -b com.apple.driver.AppleUSBCardReader
However my first try got me an error similar to the one result [WayBack] External USB disk sometimes requires a reboot to be recognized after eject – Ars Technica OpenForum I found after searching for “class com_apple_driver_AppleUSBCardReaderDriverNub has” “instances.”:
7/28/16 10:05:54.000 AM kernel[0]: Can't unload kext com.apple.driver.AppleUSBCardReader; classes have instances:

7/28/16 10:05:54.000 AM kernel[0]: Kext com.apple.driver.AppleUSBCardReader class com_apple_driver_AppleUSBCardReaderDriverNub has 2 instances.
–jeroen
Posted in Apple, Mac, MacBook, MacBook Retina, Power User | Leave a Comment »
Posted by jpluimers on 2020/07/03
A friend asked me what tools I use for downloading media, converting it to various formats (including audio extraction) and audio editing.
It is a surprisingly short list:
Most of it runs out of the box on Mac OS X/MacOS/OS X, as I’ve moved there form Windows for most of my day to day access to systems (there is a great set of Microsoft Remote Desktop in the app store: [Archive.is] Microsoft Remote Desktop 8.0 on the Mac App Store and [Archive.is] Microsoft Remote Desktop 10 on the Mac App Store; I like the first one better).
Audacity shortcuts
Read the rest of this entry »
Posted in Apple, Audacity, Audio, ffmpeg, iMac, Mac, Mac OS X / OS X / MacOS, MacBook, MacBook Retina, MacBook-Air, MacBook-Pro, MacMini, Media, Power User, Remote Desktop Protocol/MSTSC/Terminal Services, SocialMedia, Windows, YouTube, youtube-dl | Leave a Comment »
Posted by jpluimers on 2020/06/29
 For quite a while, I had the error “The application “Audacity.app” can’t be opened.” and Audacity still opening. Clicking the OK button often enough made me hunt for the solution:
This is what I did:
$ cd ~/Library/Application\ Support/audacity

$ grep Temp audacity.cfg

TempDir=/Users/jeroenp/Library/Application Support/audacity/SessionData
Then I checked if the directory existed:
Read the rest of this entry »
Posted in *nix, *nix-tools, Apple, Audacity, Audio, Mac, Mac OS X / OS X / MacOS, MacBook, MacBook Retina, MacBook-Air, MacBook-Pro, Media, Power User, sed | Leave a Comment »
Posted by jpluimers on 2020/06/05
The Terminal on Mac OS X / OS X / MacOS is very much like a Linux terminal, but there are also a lot of differences especially with keyboard, tab and process handling.
So this chapter is very much wort reading: [WayBack] 1. Inside the Terminal – Mac OS X For Unix Geeks, 4th Edition [Book]
–jeroen
Posted in Apple, iMac, Mac, Mac OS X / OS X / MacOS, MacBook, MacBook Retina, MacBook-Air, MacBook-Pro, MacMini, Power User | Leave a Comment »
Posted by jpluimers on 2020/04/13
Toggle between regular view and view all formulas in a worksheet via [WayBack] Quickly See All the Formulas in Excel with This Shortcut which I wish I had known years ago:
- Windows:
Ctrl + ` (the acute accent key, found next to the number 1 on your keyboard).
- MacOS:
Cmd + `
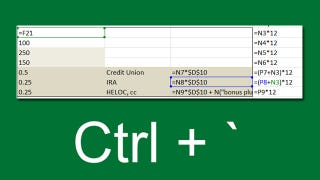
Found using image search macos excel show all formulas – Google Search
–jeroen
Read the rest of this entry »
Posted in Apple, Excel, Mac, Mac OS X / OS X / MacOS, MacBook, MacBook Retina, MacBook-Air, MacBook-Pro, macOS 10.12 Sierra, macOS 10.13 High Sierra, Office, Office 2011 for Mac, Power User | Leave a Comment »
Posted by jpluimers on 2020/03/16
[WayBack1/WayBack2] Memo to self: Ich will ein Time Machine Backup unter Linux mounten, um das “Latest” Verzeichnis mit Restic an Backblaze senden zu können. Schritt 1: Sp… – Kristian Köhntopp – Google+:
Memo to self: Ich will ein Time Machine Backup unter Linux mounten, um das “Latest” Verzeichnis mit Restic an Backblaze senden zu können.
Schritt 1: Sparsebundle mounten
# ls -l /export/tm_kk/
total 8
drwx—— 3 kris users 4096 Oct 21 16:24 KK.sparsebundle
Geht mit
# git clone git://github.com/torarnv/sparsebundlefs.git
# cd sparsebundlefs; make
# mkdir -p /bundles/tm_kk
# sparsebundlefs /export/tm_kk/KK.sparsebundle /bundles/tm_kk
# ls -lh /bundles/tm_kk
total 0
-r——– 1 root nogroup 1.5T Oct 21 16:24 sparsebundle.dmg
Schritt 2: DMG loopmounten
# fdisk -l /bundles/tm_kk/sparsebundle.dmg
Disk /bundles/tm_kk/sparsebundle.dmg: 1.5 TiB, 1648462135296 bytes, 3219652608 sectors
Units: sectors of 1 * 512 = 512 bytes
Sector size (logical/physical): 512 bytes / 512 bytes
I/O size (minimum/optimal): 512 bytes / 512 bytes
Disklabel type: gpt
Disk identifier: 15FCCBBD-49E4-42BB-B359-EF662F9916CF
Device Start End Sectors Size Type
/bundles/tm_kk/sparsebundle.dmg1 40 409639 409600 200M EFI System
/bundles/tm_kk/sparsebundle.dmg2 409640 3219390423 3218980784 1.5T Apple HFS/HFS+
# kpartx -a -v /bundles/tm_kk/sparsebundle.dmg
add map loop8p1 (253:1): 0 409600 linear 7:8 40
add map loop8p2 (253:19): 0 3218980784 linear 7:8 409640
# mkdir -p /hfs/tm_kk
# mount -o ro -t hfsplus /dev/mapper/loop8p2 /hfs/tm_kk
# b=$(readlink /hfs/tm_kk/Backups.backupdb/KK/Latest)
# ls -l /hfs/tm_kk/Backups.backupdb/KK/$b
total 0
drwxr-xr-x 1 root root 30 Oct 21 14:26 ‘Macintosh HD’
Schritt 3: tmfs mount
Ein Time Machine Backup enthält doofe Hardlinks auf Verzeichnisse. Das kann Linux so nicht, und man muß das noch einmal mit tmfs fusemounten. Seufz.
# apt-get install tmfs
# mkdir -p /tmfs/tm_kk
# tmfs /hfs/tm_kk /tmfs/tm_kk
# ls -l /tmfs/tm_kk/KK/Latest/
total 0
drwxr-xr-x 1 root root 30 Oct 21 14:26 ‘Macintosh HD’
Das durchzulesen ist nicht mal langsam.
Schritt 4: Abbauen
# umount /tmfs/tm_kk
# umount /hfs/tm_kk/
# kpartx -d -v /bundles/tm_kk/sparsebundle.dmg
del devmap : loop8p1
del devmap : loop8p2
loop deleted : /dev/loop8
# umount /bundles/tm_kk
Schritt 5: Den Mist scripten
…
A few important comments from the WayBack2 link:
Jeroen Wiert Pluimers:
So your time machine data is on a Linux disk that you export from Linux to MacOS? (as otherwise, I don’t understand what /export/tm_kk/KK.sparsebundle is for)
Kristian Köhntopp:
Yes, I am running netatalk, SMB and NFS on an Ubuntu 18.04.
Jeroen Wiert Pluimers:
+Kristian Köhntopp Thanks. What do you envision as steps to restore a complete time machine?
Kristian Köhntopp:
We will see. I do not see that as normally necessary. Mostly I do not want to lose the work on my laptop, and am just to lazy to restrict the backup to that. In general, it should be possible to create this as a writeable setup so that I get the data back. I will probably never recreate a full runnable mac setup from this emergency offsite backup.
Tools used:
–jeroen
Posted in *nix, *nix-tools, Apple, Backup, Mac, Mac OS X / OS X / MacOS, MacBook, Power User | Leave a Comment »




 The Wiert Corner - irregular stream of stuff