The Wiert Corner – irregular stream of stuff

Jeroen W. Pluimers on .NET, C#, Delphi, databases, and personal interests

  • My badges

  • Twitter Updates

  • My Flickr Stream

  • Pages

  • All categories

  • Enter your email address to subscribe to this blog and receive notifications of new posts by email.

    Join 1,860 other subscribers

Archive for the ‘Word’ Category

Office suites trick I was unaware off: you can use images as background of shapes, then distort by moving the corner points

Posted by jpluimers on 2025/05/26

Video thumbnail

Video thumbnail

The below example is in Excel, but it holds for many other drawing tools in other office suites as well (like the ones in OpenOffice and successors like LibreOffice, Apple Pages in iWork, and others from the list of office suites):

  1. Insert a shape
  2. Move the corners so it covers the area you want a screenshot in
  3. Modify the shape background to contain the screenshot as background

(you can exchange steps 2 and 3 if you wish, and even go for more complex shapes – including ones where you can add corner points – to better fit the area where you want the distorted screenshot to appear).

Example in (typo was indeed in the tweet) [Wayback/Archive] Excel Dictionary on X: “Are you ready for this Excel tip? Get ready to learn how to easily scew images. 🤯”: Read the rest of this entry »

Posted in Excel, Office, Power Point, Power User, Visio, Word | Leave a Comment »

Markdown has been the Internet’s lingua franca for documentation. Microsoft finally the documentation format with markitdown: Python tool for converting files and office documents to Markdown.

Posted by jpluimers on 2024/12/17

Finally an easier way to convert Office documents (and other formats) to markdown: [Wayback/Archive] GitHub – microsoft/markitdown: Python tool for converting files and office documents to Markdown. (after Google added a Markdown export feature to Google Docs about half a year ago, and basic Markdown formatting about 2 years ago – see below):

There are quite a few dependencies in [Wayback/Archive] markitdown/pyproject.toml at main · microsoft/markitdown · GitHub, so be prepared for that.

Supported formats (added links for clarity):

The MarkItDown library is a utility tool for converting various files to Markdown (e.g., for indexing, text analysis, etc.)
It presently supports:
  • PDF (.pdf)
  • PowerPoint (.pptx)
  • Word (.docx)
  • Excel (.xlsx)
  • Images (EXIF metadata, and OCR)
  • Audio (EXIF metadata, and speech transcription)
  • HTML (special handling of Wikipedia, etc.)
  • Various other text-based formats (csv, json, xml, etc.)

Google was first though:

  1. [Wayback/Archive] Google Workspace Updates: Compose with Markdown in Google Docs on web
  2. [Wayback/Archive] Google Workspace Updates: Import and export Markdown in Google Docs

There is speculation on why Microsoft introduced it just now ranging from “they need it for AI training” to “just late to the game”. I’m with the latter. Apple is even later, so if you want to convert Apple Notes to markdown, then you can use [Wayback/Archive] Import from Apple Notes – Obsidian Help.

Via various sources, including:

Read the rest of this entry »

Posted in CSV, Development, Excel, HTML, HTML5, JSON, Lightweight markup language, MarkDown, Office, PDF, Power Point, Power User, Software Development, Word, XML/XSD | Tagged: , | Leave a Comment »

210mm x 99mm Blank Label Template – Microsoft Word – EU30032

Posted by jpluimers on 2024/05/13

I tried archiving the page 210mm x 99mm Blank Label Template – Microsoft Word – EU30032 and the template http://templates.uk.onlinelabels.com/TemplateFile/eu30032-template/EU30032.doc, but that fails because that site refuses to be archived in the WayBack machine and Archive.is.

So here is a local copy of [WayBack] eu30032.doc.

Related (not tried yet):

  • [WayBack] Labels A4, 210 x 99 mm, white, permanent adhesion
    Ref. no. 4664
    Format 210 x 99 mm
    Content 300 labels / 100 sheets
    Colour white
    Printer type Laser, Copy, Ink
    Adhesive characteristics permanent
    Shape of corners square
    Material paper, matt
    Environment PEFC-certified
    EAN 4008705046640
    PEFC certificate [WayBack] Download now
    Printing template / Processing information [WayBack] Download now
  • [WayBack] Printing Template for Labels – 210 mm x 99 mm – 3 Rectangle Labels per A4 Sheet (Word/PDF) | Template For Labels
    210-mm-99-mm-3-Rectangle-Label-per-A4-Sheet
    Free Download Label Printing Template
    [WayBack] word-icon Word Template
    [WayBack] pdf-icon PDF Template
    There are 3 Rectangle Labels per page with each label being 210 mm wide and 99 mm high.There is a 0 mm gap between the label rows and 0 mm gap between the label columns to determine whether you can create your design with bleed or not. Whilst producing the design, due to printing restrictions on digital presses, you must consider that there is a 0 mm margin on both top and bottom of the sheet, and 0 mm margin on left and right hand side of the sheet.

    Please read your printer manual carefully as each printer has a printing tolerance of up to 2 mm. You must accommodate this tolerance by producing your design with enough bleed and/or leave enough gap between the label contents and the label cut line.

–jeroen

Posted in LifeHacker, Office, Power User, Word | Leave a Comment »

Using Fields in Microsoft Word – a Tutorial in the Intermediate Users’ Guide to Microsoft Word

Posted by jpluimers on 2023/09/15

This page has a truckload of information, but has a short index and few anchor targets: [Wayback/Archive] Using Fields in Microsoft Word – a Tutorial in the Intermediate Users’ Guide to Microsoft Word.

I found it doing these searches:

I needed them because I misread it at first and replaced { SAVEDATE \* MERGEFORMAT } with { SAVEDATE \* "dd-mm-yyyy" } which resulted in the field to become displayed as needed Error! Unknown switch argument.. and at first thought this might be a Windows versus MacOS thing.

Fixing the error with { SAVEDATE \@ "dd-mm-yyyy" }) almost solved the problem, as the actual format should be { SAVEDATE \@ "dd-MM-yyyy" } (which displays month number instead of minute number).

So I learned that Word date formatting is almost the same as Excel date formatting.

I was specifically looking for these bits (the first luckily has the #Charformat anchor and was immediately followed by the latter):

Read the rest of this entry »

Posted in Office, Power User, Word | Leave a Comment »

Word: have part of Heading 1/2/3 not show up in the table of contents

Posted by jpluimers on 2021/10/01

Every now and then, for instance with a document including other documents, like in a homework assignment, you might want to exclude part of your Heading 1 (or Heading 2/Heading 3) entries from the table of contents.

Since presence in the Table of Contents is a ToC feature, not a style feature, you have to set the correct options in the ToC.

This is how you do it:

  1. Create new styles for the headings you do not want in the ToC (I call them “Heading 1, no ToC”; “Heading 2, no ToC”; etcetera) and base each on the corresponding style “Heading 1” or “Heading 2”

  2. Modify your Table of Contents to exclude these new styles (as they are automatically included)

This is contrary to many advices to use the “Reference” toolbar, then “Add Text” marked “Do Not Show In Table Of Contents”. That advice will remove the heading formatting completely and remove it from the navigation pane, so do not follow [WayBack] Quick Tip: How to exclude headings from the Table of Contents in Microsoft Word – jeffreykusters.nl.

The above solution both keeps the formatting, and the appearance in the navigation pane. It only disappears from the Table of Contents.

It is based on:

Following the above steps, you get styles like this:

Read the rest of this entry »

Posted in Office, Office 2010, Office 2011 for Mac, Office 2013, Office 2016, Power User, Word | Leave a Comment »

Winword: parts of the document with numbered, but other parts (Table of Contents, Summary) without numbering

Posted by jpluimers on 2021/06/11

Steps to have only the body parts of your Winword document Heading 1 numbered, but parts like Summary and Table of Contents without numbering.

Related:

Steps:

  1. Create a document with
    • some paragraphs of body text, intertwined with:
      • some paragraphs that should become numbered headings,
      • some paragraphs that should become non-numbered headings
      • room for a table of context
  2. Go to the “Styles” popup (keyboard shortcut Ctrl+Shift+Alt+S, or ribbon “Home” -> section “Styles” -> small button on the lower right of the ribbon section
  3. For each paragraph that should become a heading, apply style “Heading 1” (you can also use keyboard shortcut Ctrl+Alt+1 for this)
  4. Modify the various heading levels so they become numbered: see [WayBack] How to create numbered headings or outline numbering in Word 2007 and Word 2010 | ShaunaKelly.com. I prefer the hierarchical numbered multilevel list without the numbers being indented for the body text, but with indented numbers in the Table of Contents, so lets go.
    1. Start with the stock multi-leveled list definition:
      1. Change from “None” to the multi-level one:
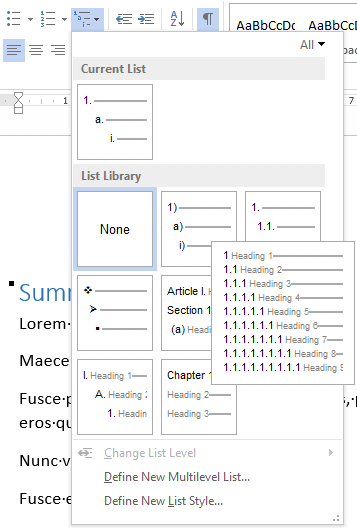
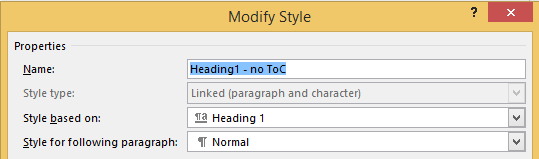
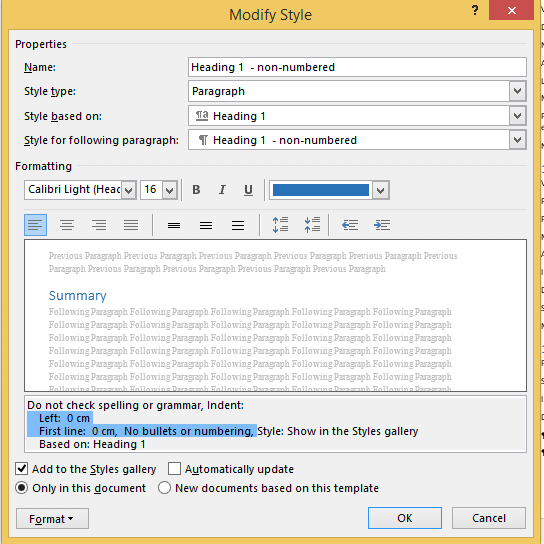
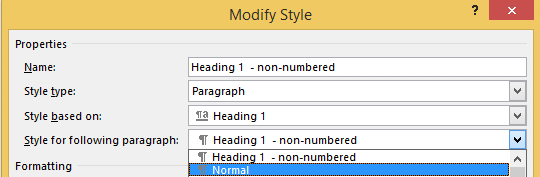
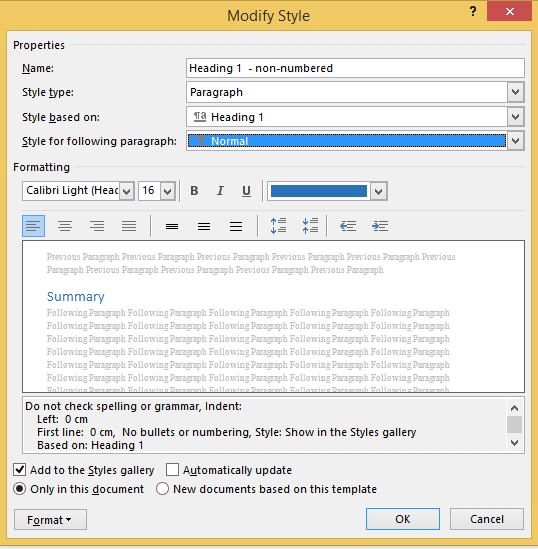
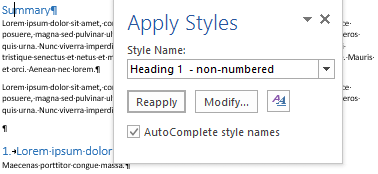
      2. Now create a new one based on it:
        1. “Define New List Style…”:
        2. Rename from “Style1” to “Heading
    2. This involves creating a new list style called “Headings”, based on the numbered list style you like
      • ).
    3. Since by default, these bind to all levels, your document styles “Heading 1”..”Heading 9″ are covered. If for one or more styles, you do not want numbering, see below how to fix that (I do that for a “Heading 1 – no-numbering” style used for the “Summary” heading, and for the “TOC Heading” style.
  5. Mark the “Summary” heading as a new style “Heading 1 – non-numbered”:
    1. Press Ctrl+Shift+S to get to the “Apply Styles” 
    2. Enter the new name “Heading 1 – non-numbered” and press the “New” button: 
    3. Press the “Modify” button 
    4. to view the current style
    5. Press “Format” ->     
    6. Change it from “None” 
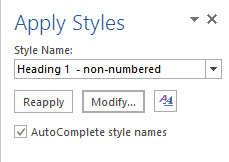
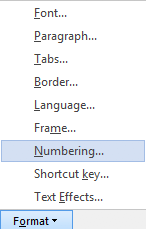
to “None” and press “OK”
    7.  Observe the numbering is gone:
    8. Unlike the “Heading 1” style, the “Style for following paragraphs” is wrong: it needs to be
    9. Now we are done, so press the “OK” button:
    10. Then observe the first numbered “Heading 1” now has got the number “1” instead of the “Summary”:
  6. Insert a “Table of Contents”, for instance after the “Summary”
    1. You might think it will start with a heading “Table of Contents”:
    2. Im some localisations of office, it is prepended with a “1.” and becomes “1. Table of Contents”. If it does, then you have to change style “TOC Heading” and undo the numbering as done with “Heading 1 – non-numbering” by pressing Ctrl+Shift+S when you are in the “Table of Contents” heading:
    3. From there, press the “Modify” button and continue as done with “Heading 1 – non-numbering”:

–jeroen

Posted in Office, Office 2007, Office 2010, Office 2013, Office 2016, Power User, Word | Leave a Comment »

Random, Quick Brown Fox and Lorem Ipsum – How to Add Filler Text in Microsoft Word Documents

Posted by jpluimers on 2021/06/07

Choices:

  • =lorem(...): Ramdom Lorem Ipsum text paragraphs.
    • The sentences are roughly between 0.25 and 1.0 document widths in length.
  • =rand(...): Random English help text like paragraphs.
    • The sentences are roughly between 0.5 and 1.5 document width in length.
  • =rand.old(...): “The quick brown fox jumps over the lazy dog.” paragraphs (up until Word 2003, this was what rand(...) returned).
    • The sentences are always the same length.

(...) parameters:

  • (x,y): x paragraphs of y sentences of text
  • (y): y paragraphs of 3 sentences of text (lorem more towards 1, rand more towards 3)
  • (): depends on the function:
    • =lorem(): 5 paragraphs of 3 sentences of text
    • =rand(): 5 paragraphs of 3 sentences of text
    • =rand.old(): 3 paragraphs of 3 sentences of text

Note:

  • There is no way to specify x paragraphs of random number lines of text.
  • They need to have “Replace text as you type” enabled (see menu option “File” -> “Options” -> “Proofing” -> “Autocorrect Options”)
  • Word 2003 and lower only have =rand(...)

Based on:

Related: [WayBack] 10 awesome Lorem Ipsum alternatives – Justinmind via [WayBack] rand () in word – Microsoft Tech Community – 325554

For a random document demo, I usually do this:

  1. =lorem(100,1) to get 100 paragraphs of 1 line of text
  2. About every 10 paragraphs, I mark a paragraph with a relevant Heading style
  3. Inside the remaining text, I combine some paragraphs to get longer ones

–jeroen

Posted in Office, Office 2003, Office 2007, Office 2010, Office 2013, Office 2016, Power User, Word | Leave a Comment »

Office 2013 Proofing tools downloads

Posted by jpluimers on 2021/03/05

For my link archive:

Via:

Posted in Office, Office 2013, Power User, Word | Leave a Comment »

Word Shortcuts links

Posted by jpluimers on 2021/02/12

I was trying to get the love of my life from using a mouse into keyboard shortcuts.

They come natural to me as I learned them step by step from Word for Windows 1.0 until now as I have been a keyboard person since the early 1990s.

But she has been a mouse person all her life, struggling to become faster using word. The mouse became a hindrance, especially since so much has moved around to deeper levels in the Word user interface over time.

This is what I came up with after doing a few searches on-line:

I was amazed at how scattered out and incomplete the information in these links is.

–jeroen

Posted in Office, Power User, Word | Leave a Comment »

Resize a table in Word or PowerPoint for Mac – Office Support

Posted by jpluimers on 2019/11/08

Why does it take forever for Microsoft Office suite programs to function the same across their various components and over operating systems. It has been like 2 decades and still sizing columns/rows in tables is a nightmare.

[WayBack] Resize a table in Word or PowerPoint for Mac – Office Support.

In my case PowerPoint: it is so different from Excel, and even different from Word, that it gives me headaches.

This is what PowerPoint 2011 could do; more recent versions are only marginally better:

PowerPoint

You can resize a whole table to improve readability or to improve the visual effect of your document. You can also resize one or more rows, columns, or individual cells in a table.

Do any of the following:

Resize a table

  1. Click the table.
  2. Rest the pointer on any corner of the table until Table Resize Cursor 
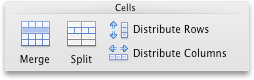
appears, and then drag the table boundary until the table is the size that you want.

Change the row height in a table

  1. Rest the pointer on the row boundary that you want to move until Horizontal split arrow appears, and then drag the boundary until the row is the height that you want.

    If you have text in a table cell, the row must be the same height or taller than the text.

Change the column width in a table

  1. Rest the pointer on the column boundary that you want to move until Vertical split arrow appears, and then drag the boundary until the column is as wide as you want.

    If you have text in a table cell, the column must be as wide as or wider than the text.

Change the row or column to fit the text

  • Rest the pointer on the column boundary until Vertical split arrow appears or the row boundary until Horizontal split arrow appears, and then double-click it.

Make multiple rows or columns the same size

  1. Select the columns or rows that you want to make the same size, and then click the Table Layout tab.
  2. Under Cells, click Distribute Rows or Distribute Columns.

    Tables Layout tab, Cells group

–jeroen

Posted in Office, Office 2011 for Mac, Power Point, Power User, Word | Leave a Comment »