The Wiert Corner – irregular stream of stuff

Jeroen W. Pluimers on .NET, C#, Delphi, databases, and personal interests

  • My badges

  • Twitter Updates

  • Pages

  • All categories

  • Enter your email address to subscribe to this blog and receive notifications of new posts by email.

    Join 1,854 other subscribers

Archive for the ‘Power User’ Category

Protocols and Networks – PlexodusWiki

Posted by jpluimers on 2020/11/23

The G+ exodus caused some people to create some great information on available online messaging and social-networking / social-media / social-graph based technologies: [WayBack] Protocols and Networks – PlexodusWiki.

Via [WayBack] Protocols and Networks +Mr. McNoname compiled and formatted an excellent rundown of open & federated social networking protocols. This is the kind of… – Edward Morbius – Google+

–jeroen

Posted in LifeHacker, Power User, SocialMedia | Leave a Comment »

Griffon | Product: Griffon Zacht Lijm PVC M-385 250ml

Posted by jpluimers on 2020/11/23

[WayBack] Griffon | Product: Griffon Zacht Lijm PVC M-385 250ml

For repairing PVC: Griffon M-385 – Google Search

Alternative: 5410091262549 – Google Search ([WayBack] Contactlijm Transparant – Pattex)

–jeroen

Read the rest of this entry »

Posted in LifeHacker, Power User | Leave a Comment »

Forcing the queue on individual email message

Posted by jpluimers on 2020/11/23

I tried the trick from [WayBack] Forcing the queue on individual email message. Despite what the linked post says, on my system, the email is not sent, but bounces, and the queue files get lost, so there is no way to get to the original content without a proper back-up mechanism (which – for transient data like queued email messages – often is not implemented).

The reason is the -oTnow parameter. It is kind of documented, but none of that is returned via the “sendmail” “-oTnow” – Google Search.

Before explaining the cause and workaround deeper, these are the relevant documentation parts:

I could not find the 8.15 operations guide as PDF, but the version 8.12 HTML edition is mostly the same as the PDF (Despite the time span between those releases spanning 14 years, parameters and configuration options didn’t change a whole lot), so as the HTML is easier to quote, here we go:

The arguments; -q, -o versus -O options

[WayBack] www.sendmail.org/~ca/email/doc8.12/op-sh-7.html “ACKNOWLEDGEMENTS” explains the basic arguments as well:

Arguments must be presented with flags before addresses. The flags are:

-oxvalue
Set option x to the specified value. These options are described in Section 5.6.
-Ooption=value
Set option to the specified value (for long form option names). These options are described in Section 5.6.

-q[!]Xstring
Run the queue once, limiting the jobs to those matching Xstring. The key letter X can be I to limit based on queue identifier, R to limit based on recipient, or S to limit based on sender. A particular queued job is accepted if one of the corresponding addresses contains the indicated string. The optional ! character negates the condition tested. Multiple -qX flags are permitted, with items with the same key letter or'ed together, and items with different key letters and'ed together.

[WayBackwww.sendmail.org/~ca/email/doc8.12/op-sh-5.html “THE WHOLE SCOOP ON THE CONFIGURATION FILE” goes into more detail:

O — Set Option

There are a number of global options that can be set from a configuration file. Options are represented by full words; some are also representable as single characters for back compatibility. The syntax of this line is:

O option = value

This sets option option to be value. Note that there must be a space between the letter `O’ and the name of the option. An older version is:

O ovalue

where the option o is a single character. Depending on the option, value may be a string, an integer, a boolean (with legal values tTf, or F; the default is TRUE), or a time interval.

then lists the relevant options for us:

QueueTimeout=timeout
[T] A synonym for Timeout.queuereturn. Use that form instead of the QueueTimeout form.

Timeout.type=timeout
[r; subsumes old T option as well] Set timeout values. For more information, see section

The -oT parameter, or T option sets timeouts

[WayBack] www.sendmail.org/~ca/email/doc8.12/op-sh-4.html “TUNING” has a whole section on

Timeouts

All time intervals are set using a scaled syntax. For example, 10m represents ten minutes, whereas 2h30m represents two and a half hours. The full set of scales is:

s seconds
m minutes
h hours
d days
w weeks

There is also a special timeout value now, and timeouts can be defined in various levels, including message timeouts:

Message timeouts

After sitting in the queue for a few days, an undeliverable message will time out. This is to insure that at least the sender is aware of the inability to send a message. The timeout is typically set to five days. It is sometimes considered convenient to also send a warning message if the message is in the queue longer than a few hours (assuming you normally have good connectivity; if your messages normally took several hours to send you wouldn’t want to do this because it wouldn’t be an unusual event). These timeouts are set using the Timeout.queuereturn and Timeout.queuewarn options in the configuration file (previously both were set using the T option).

If the message is submitted using the NOTIFY SMTP extension, warning messages will only be sent if NOTIFY=DELAY is specified. The queuereturn and queuewarn timeouts can be further qualified with a tag based on the Precedence: field in the message; they must be one of urgent (indicating a positive non-zero precedence) normal (indicating a zero precedence), or non-urgent (indicating negative precedences). For example, setting Timeout.queuewarn.urgent=1h sets the warning timeout for urgent messages only to one hour. The default if no precedence is indicated is to set the timeout for all precedences. The value “now” can be used for -O Timeout.queuereturn to return entries immediately during a queue run, e.g., to bounce messages independent of their time in the queue.

Since these options are global, and since you cannot know a priori how long another host outside your domain will be down, a five day timeout is recommended. This allows a recipient to fix the problem even if it occurs at the beginning of a long weekend. RFC 1123 section 5.3.1.1 says that this parameter should be “at least 4-5 days”.

The Timeout.queuewarn value can be piggybacked on the T option by indicating a time after which a warning message should be sent; the two timeouts are separated by a slash. For example, the line

OT5d/4h

causes email to fail after five days, but a warning message will be sent after four hours. This should be large enough that the message will have been tried several times.

So the -oT is the T option, which is shorthand for -oTimeout.queuereturn. (well, actually you can combine Timeout.queuewarn using a slash).

Specifying now gives you this behaviour: The value “now” can be used for -O Timeout.queuereturn to return entries immediately during a queue run, e.g., to bounce messages independent of their time in the queue.

Of course that bounces, invalidating the below -oTnow trick.

The -qI parameter, or I queue flag for message identifier

You can also limit the jobs to those with a particular queue identifier, recipient, sender, or queue group using one of the queue modifiers. For example, -qRberkeley restricts the queue run to jobs that have the string berkeley somewhere in one of the recipient addresses. Similarly, -qSstring limits the run to particular senders, -qIstring limits it to particular queue identifiers, and -qGstring limits it to a particular queue group. You may also place an ! before the I or R or S to indicate that jobs are limited to not including a particular queue identifier, recipient or sender. For example, -q!Rseattle limits the queue run to jobs that do not have the stringseattle somewhere in one of the recipient addresses. Should you need to terminate the queue jobs currently active then a SIGTERM to the parent of the process (or processes) will cleanly stop the jobs.

So the -qI flag followed by an identifier only processes that message.

Sending to a host that got marked as timeout: the Timeout.hoststatus option

When sending just one message, you definitely want to disregard any cached host timeout status: you want to retry the message now, not skip it just because the host had a timeout a while ago.

This is where the -OTimeout.hoststatus=0m comes in: it sets the cache to zero minutes.

Below are the relevant bits of documentation.

[WayBack] cf/m4/README.txt:

confTO_HOSTSTATUS  Timeout.hoststatus
                    [30m] How long information about host
                    statuses will be maintained before it
                    is considered stale and the host should
                    be retried.  This applies both within
                    a single queue run and to persistent
                    information (see below).
...
confHOST_STATUS_DIRECTORY HostStatusDirectory
                    [undefined] If set, host status is kept
                    on disk between sendmail runs in the
                    named directory tree.  This need not be
                    a full pathname, in which case it is
                    interpreted relative to the queue
                    directory.

[WayBack] chapter 4 “TUNING”

Read timeouts

Timeouts all have option names Timeout.suboption. Most of these control SMTP operations. The recognized suboptions, their default values, and the minimum values allowed by RFC 2821 section 4.5.3.2 (or RFC 1123 section 5.3.2) are:

hoststatus
How long status information about a host (e.g., host down) will be cached before it is considered stale [30m, unspecified].

A trick that really works

With the above information,

sendmail -v -OTimeout.hoststatus=0m -qImessage_identifier

So it is now a bash function for me: sendmail-retry-one-messae-by-queue-ID:

function sendmail-retry-one-messae-by-queue-ID() {
  sendmail -v -OTimeout.hoststatus=0m -qI$1                     
}

Back to the original “trick” (that makes you loose the message)

I made it into a function:

function sendmail-bounce-one-message-by-queue-ID() {
  sendmail -oTnow -qI$1
}

From [WayBack] Forcing the queue on individual email message:

comp.mail.sendmail

Paul Aviles wrote:

> I know about sendmail -q, but is is possible to individually kill a 
> pending queued email or force it with or without an NDA?

This is simple. Use the mailq command to find the local queue ID of the message. It will look something like:

      k5PBASdd010482

You can then flush the message with:

      sendmail -qIyourqueueID -oTnow

The “I” flag to the -q flag specifies which queue ID to use. The -oTnow flag sets the queue timeout to “now”. Note sendmail will still try to deliver the message once when you do this. If this is not OK, then blow the message away with:

      rm /var/spool/mqueue/*yourqueueID

But the timeout is much recommended over blowing the message away.

Just another “Harker’s Helpful Hints”

RLH

–jeroen

Posted in *nix, *nix-tools, Power User, sendmail | Leave a Comment »

Adreswijziging belastingdienst voor bewindvoering natuurlijk persoon (beschermingsbewind)

Posted by jpluimers on 2020/11/20

De belastingdienst noemt de bewindvoering van een natuurlijk persoon op een natuurlijk persoon beschermingsbewind.

Dat was initieel een beetje verwarrend (omdat je de uitleg van die term nergens op de site van de belastingdienst kunt terugvinden), maar daardoor werd wel duidelijk wat het juiste formulier is om in te sturen:

[Wayback] www.belastingdienst.nl/wps/wcm/connect/bldcontentnl/themaoverstijgend/programmas_en_formulieren/aanmelden_wijzigen_of_beeindigen_beschermingsbewind

Insturen kon per e-mail: reuze handig!

Meer info:

Read the rest of this entry »

Posted in About, Curatele, LifeHacker, Personal, Power User | Leave a Comment »

(German): the mid 1980s stories of calling Peter Norton for free from a German phone booth, and hacking the phone lines that mobile telecom equipment sales vans connected to.

Posted by jpluimers on 2020/11/20

Two great German stories from the mid 1980s posted mid 2020.

They translate fine in Google, so enjoy!

Read the rest of this entry »

Posted in dial-up modems, History, Power User | Leave a Comment »

Meldingen over foutparkeren in Amsterdam buiten kantoor-uren: bellen naar 14020 of via https://web.archive.org/web/20181224135325/https:/twitter.com/webcare020/status/1077198930876788737

Posted by jpluimers on 2020/11/20

[WayBack] Webcare Amsterdam on Twitter : “Hee Jeroen, jammer dat de auto nu al weg is. Mocht je in het weekend weer een melding willen doen dan kan dat via 14020 of via meldingen.amsterdam.nl. Fijne feestdagen toegewenst! ^TR…”

Buiten kantoortijden melden van foutparkeerders:

–jeroen

Read the rest of this entry »

Posted in LifeHacker, Power User | Leave a Comment »

FeaturesShim: using ShimGen for creating a shim to a program either console or GUI so you need only one bin directory

Posted by jpluimers on 2020/11/17

[WayBack] FeaturesShim is a cool Chocolatey feature that uses ShimGen.

This allows Chocolatey to take only one directory in your search PATH, with a lot of small files, that link to the much larger actual executable files.

ShimGen (like many other parts of Windows and some other parts of Chocolatey) is not open source, but the mechanism is documented.

More information:

–jeroen

Posted in .NET, Development, Power User, Software Development, Windows, Windows Development | Leave a Comment »

OSX 10.13 with vSphere 6.7 – Virtual Odyssey

Posted by jpluimers on 2020/11/16

Interesting: I never realised that getting MacOS installed on ESXi was relatively easy!

[WayBack] OSX 10.13 with vSphere 6.7 – Virtual Odyssey:

vCenter 6.7a/ESXi 6.7a Installing OSX 10.13 seemed pretty straight forward on 6.7. Essentially, you mount the ISO as per usual, and the only thing I had to do before starting the installation was to format the disk via terminal. Once…

So no need for all this:

–jeroen


Posted in ESXi6.5, ESXi6.7, Power User, Virtualization, VMware, VMware ESXi | Leave a Comment »

Wifispots instellen | Klantenservice | Ziggo

Posted by jpluimers on 2020/11/16

Voor mijn archief: de truc is het certificaat. Zonder dat werkt het niet, ondanks juiste credentials.

Wifispots instellen

Gratis wifi tappen terwijl je de hort op bent? Stel Wifispots in op je smartphone, tablet en laptop. Als je favoriete hotspot in Nederland Wifispots heeft ingesteld, bespaar je mobiele data voor de momenten dat je er even echt helemaal uit bent. Kun je lekker een ijsje kopen in plaats van extra MB’s.

Wil je deze tocht voltooien? Zorg dat je dit afvinkt:

  • Je persoonlijke inloggegevens voor Wifispots,die staan in Mijn Ziggo.
  • Een internetabonnement van Ziggo
  • Een voor wifi geschikt toestel (bijvoorbeeld een laptop, smartphone of tablet)

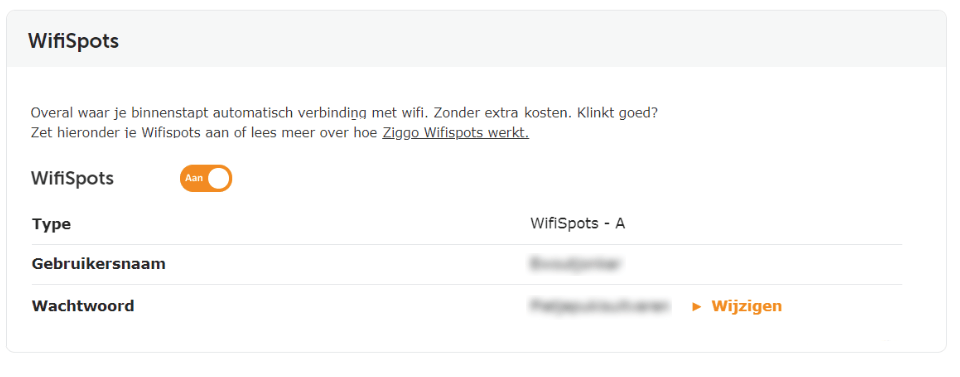
  Het zijn behoorlijk veel stappen, maar de meeste klanten hebben in 10 minuten Wifispots ingesteld.

1

Voordat je begint

Het is niet mogelijk om een verbinding te maken met je eigen Wifispot. Dat komt omdat je eigen wifi-netwerk een veel sterker signaal uitzendt dan je Wifispot. Als je eigen wifi-netwerk binnen bereik is, raden we je altijd aan om daar verbinding mee te maken.

Wifispots kun je het best gebruiken buiten de deur. Bijvoorbeeld bij vrienden thuis, bij een klant op kantoor of in het winkelcentrum.

Verbind je voor het eerst met Wifispots en ben je thuis? Maak dan bijvoorbeeld verbinding met de Wifispot van de buren. Je hoeft maar één keer een verbinding te maken en daarna ben je automatisch verbonden met alle Wifispots van Ziggo als je in de buurt bent.

Ga verder
2

In de volgende stappen laten we zien hoe je Wifispots handmatig instelt op je apparaat. Daarvoor heb je een Wifispots gebruikersnaam en wachtwoord nodig. Je vindt ze in Mijn Ziggo.

Stel je Wifispots in op je smartphone of tablet? Gebruik dan een ander apparaat (bijvoorbeeld je laptop) om dit stappenplan te doorlopen. Zo lees je alle aanwijzingen in dit stappenplan op het ene scherm en installeer je Wifispots op je smartphone of tablet op het andere scherm.

a.

 Klik op Log in om Mijn Ziggo te openen in een nieuw venster. Voer je inloggegevens in om in te loggen op Mijn Ziggo.

Ben je je Mijn Ziggo inloggegevens vergeten? Vraag ze opnieuw op.

b.

Kies na het inloggen voor Producten en klik op het tabblad Internet.

c.

Scroll naar beneden naar Wifispots. Hier zie je je Wifispots gebruikersnaam en wachtwoord. Noteer deze gegevens. We hebben ze straks nodig.

Ook zie je hier je welke Type Wifispots je hebt.

Welk typeWifispots zie je in Mijn Ziggo staan?

A B
3

Wat wil je instellen?

Naast Wifispots van Ziggo kun je in Zeeland gebruik maken van de DELTA WifiSpots, handig voor als je in Zeeland op vakantie bent.

Welke Wifispots wil je instellen?

Ziggo Wifispots DELTA WifiSpots
4

Kies het merk of besturingssysteem van je apparaat

Android

Apple

Windows

Overige

5

Kies het merk of besturingssysteem van je apparaat

Samsung

Huawei

LG

HTC

Sony

Overige

6

Download het Wifispots certificaat

Bekijk je dit stappenplan op een ander apparaat? 
Scan de QR-code op deze pagina om het certificaat meteen te downloaden.

Heb je geen QR-scanner? 
Ga dan naar ziggo.nl/certificaat om het certificaat te downloaden.

Verder
7
  • Vul bij Certificaatnaamin: Ziggo
  • Gebruik van certificaatgegevens: Wifi
  • Druk op OK
Verder
8

Heeft je toestel nog geen vergrendelbeveiliging? Dan wordt je nu gevraagd deze in te stellen.

Krijg je een melding om vergrendelbeveiliging in te stellen?

ja nee
9

Druk op Pincode.

Verder
10

Kies een pincode en druk op Doorgaan.

Verder
11

Bevestig de pincode en druk op OK.

Verder
12

Sluit je internetbrowser ga naar je Apps.

Hoe je precies bij al je apps komt, verschilt per merk. In dit geval swipe je omhoog of druk je op het pijltje.

Verder
13

Druk op Instellingen.

verder
14

Druk op Netwerk en internet.

Verder
15

Druk op Wifi.

Verder
16

Druk op het draadloze netwerk met de naam Ziggo. Je apparaat logt vanaf nu altijd vanzelf in op alle WifiSpots. Goed om te weten: wanneer je de stappen uit dit stappenplan voor je apparaat hebt gevolgd, wordt je nooit meer gevraagd om de verbinding met WifiSpots met ‘OK’ of ‘accept’ te bevestigen.

Tip: We raden je aan om nooit verbinding te maken met wifi-netwerken die je niet vertrouwt. Doe je dat wel dan loop je het risico dat je hackers toegang geeft tot je smartphone, tablet of laptop. Zonder dat je het doorhebt.

Let op: zie je geen draadloos netwerk met de naam Ziggo? Schakel de wifi op je smartphone even uit en vervolgens weer aan. En controleer ook of je in de buurt zit van een Ziggo wifi-modem.


Krijg je nu een pop-up melding te zien of zie je bij het netwerk Ziggo ‘verbonden’ staan?

Ik krijg een pop-up melding Ik zie staan ‘verbonden’
17
  • Kies bij EAP-methode voor PEAP.
  • Kies bij Phase 2-verificatie voor MSCHAPV2.
Verder
18

Selecteer bij CA-certificaat het certificaat met de naam Ziggo uit Stap 6.

Verder
19
  • Geef bij Identiteit je WifiSpots gebruikersnaam op.
  • Laat Anonieme identiteit leeg.
  • Vul bij Wachtwoord je Wifispots wachtwoord in.
  • Druk op Verbinden.

Zie je een melding over netwerkcontrole?

Ja Nee

Gefeliciteerd!

Je hebt Wifispots succesvol ingesteld.

Goed om te weten:

  • Je kunt vijf apparaten instellen voor gebruik met Wifispots. Wil je WifiSpots gebruiken op een ander apparaat? Vergeet dan niet de Wifispots instellingen op een van de eerder ingestelde apparaten te verwijderen.
  • Voortaan ben je automatisch verbonden als je in de buurt bent van een Wifispot. Bijvoorbeeld bij vrienden of relaties, in je favoriete koffietentje of in het winkelcentrum.
  • Op je eigen wifi-modem kun je geen verbinding maken met Wifispots. Dat is omdat je eigen modem een veel snellere wifi-verbinding heeft dan de Wifispots. Je bent nu wel automatisch verbonden met Wifispots op alle andere plekken waar ze beschikbaar zijn.
–jeroen

Posted in Power User, WiFi | Leave a Comment »

Pokestop not turning purple in Pokemon go

Posted by jpluimers on 2020/11/16

Found the cause of Pokemon stops not turning purple via [WayBackHas anyone else had issues with lures/incense not attracting pokemon? : pokemongo: phone was set on manual time (which was correct), and had time zone wrong for the current GPS location.

Now Pokeomon go gets confused, so does not want to guess the state of the Pokestop.

Via: [WayBackLures not spawning anything. Pokestops won’t turn purple. [BUG] : pokemongo

–jeroen

Read the rest of this entry »

Posted in LifeHacker, Power User | Leave a Comment »