A while ago, This does not compute had a few nice videos on a Mac SE/30 and it’s repair, including the recap process of replacing the electrolytic capacitors (or condensators in some other languages), and cleaning the board (some wash it with hot water and soap, others with isopropyl-alcohol, often called rubbing alcohol).
Note the simasimac can have many causes: bad capacitors in main board are the most common, but it can also be bad memory.
Bringing a Zebra Stripe SE/30 Back to Life, Paul Brierley, The ‘Book Beat, 2009.02.19. The Japanese call it Simasimac, the horizontal striped pattern that indicates your Mac is terminal.
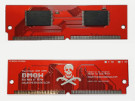
The Mac ROM-inator II replaces the stock Macintosh ROM SIMM with a custom flash memory module. Add a bootable ROM disk, make your system 32-bit clean, gain HD20 hard disk support, and more. The Mac ROM-inator II supports the Macintosh SE/30, IIx, IIcx, IIci, IIfx, and IIsi.
The Mac ROM-inator II is fully assembled and ready to use. Just plug it in and go.Mac ROM-inator II Atom, $42 2 MB SIMM pre-programmed with ROM Disk with System 7.1, HDSC Setup, ResEdit, and SCSI Probe. Compatible with Mac SE/30, IIx, IIcx, IIci, IIfx, IIsi.More Info
The Mac ROM-inator II is great for breathing new life into your old SE/30 or II-series Macintosh. The ROM disk provides fast and convenient boot-ups and a collection of disk utility programs, and customized startup sounds and icons add a touch of fun. The ROM SIMM comes pre-programmed with a BMOW-made custom ROM containing the following changes:
ROM disk provides a diskless booting option
HD20 hard disk support built-in
32-bit clean – allows use of System 7.6+ and more than 8MB RAM
Memory test is disabled for faster booting on 16MB+ systems
Customized startup chime – major 9th arpeggio
Happy Mac icon is replaced by a color smiling “pirate” Mac
New startup menu screen displays installed RAM, addressing mode, and ROM disk details
The ROM-inator II is based on Doug Brown’s earlier [WayBack] Mac ROM SIMM design, used with permission.
The SE/30 is probably the most popular candidate for recapping. Unfortunately, it’s also one of the more difficult to revive as the leaked electrolyte easily damages traces and vias on these boards. Be sure to wash these boards very well and inspect closely for broken or rotten traces.
Capacitor List:
10 – 47µf – 16V – SMT
1 – 220µf – 16V – Axial
1 – 470µf – 16V – Axial
1 – 1µf – 50V – SMT
Click on the photo for a larger view
Notes
Desolder can be tricky, especially for surface mount. This helps:
Add some fresh 60/40 solder to the joints with a solder gun (as modern solder is lead free, whereas past solder contained lead)
Carefully heat up the component and surrounding area with a heat-gun
Choosing capacitors:
You can always go up in the voltage and capacitance
An item that provides click-through is one that a user can activate with one click, even though the item is in an inactive window. (To activate an item that does not support click-through, the user must first make the containing window active and then click the item.) Although click-through can make some user tasks easier, it can also confuse users if they click items unintentionally.
Click-through is not a property of a class of controls; any control, including toolbar items, can support click-through. This also means that you can support click-through for any subset of items; you don’t have to choose between supporting click-through for all items in a window or none. Follow the guidelines in this section so that you can support click-through when it’s appropriate.
Avoid providing click-through for an item or action whose result might be dangerous or undesirable. Specifically, avoid enabling click-through for an item that:
Performs a potentially harmful action that users can’t cancel (for example, the Delete button in Mail)
Performs an action that is difficult or impossible to cancel (such as the Send button in Mail)
Dismisses a dialog without telling the user what action was taken (for example, the Save button in a Save dialog that overwrites an existing file and automatically dismisses the dialog)
Removes the user from the current context (for example, selecting a new item in a Finder column that changes the target of the Finder window)
Clicking in any one of these situations should cause the window that contains the item to be brought forward, but no other action to be taken.
In general, it’s safe to provide click-through for an item that asks the user for confirmation before executing, even if the command ultimately results in destruction of data. For example, you can provide click-through for a delete button if you also make sure to give users the opportunity to cancel or confirm the action before it proceeds.
Think twice before supporting click-through for items that don’t provide confirmation feedback. Specifically, consider how dangerous the action might be, and determine how difficult it will be for the user to undo the action after it’s performed. For example, the Mail Delete button does not provide click-through because it deletes a message without asking for confirmation, which is a potentially harmful action that can be difficult to undo. On the other hand, click-through for the New button in Mail is fine because its resulting action is not harmful and is easy to undo.
Ensure that items that don’t support click-through appear disabled when their window is inactive. The disabled appearance helps users understand that these controls are unavailable. For example, the Delete and Mark as Junk buttons in the inactive Mail window shown below don’t support click-through.
Around this time, episode 500 of RetroMacCast should be out.
It’s an “about weekly” podcast centered around classic Apple computers, mainly of the Macintosh kind but occasionally also on the Apple I, ][, //e, //c and ///, IIgs and Lisa kinds.
After all these years since they started in 2006, It’s still fun to listen to.
Occasionally they do a vodcast on YouTube, for instance their 100th show below.
Back in the days, Apple and The Beatles were in a heated fight as Apple was not supposed to do anything resembling music in their systems.
So when sounds needed to be made, they could not be named by words having to do with music.
The legal team in Apple – known for lack of humor – was scrutinizing sources and documents on names that would be inappropriate.
Jim Reekes came up with letitbeep for one of the warning sounds, but that was too obvious, so he said sosumi, pretended it to be a Japanese word and named the sound just like that.
I learned from it through one of the RetroMacCast videos below. Then I found the page Sosumi – Wikipedia. So I guess I’ll be never to old to learn (:
This should run well with a Classic Color Macintosh System 7 emulated on Raspberry Pi: [WayBack] On this tutorial I show you how to run Mac II OS color on your Raspberry PI, I have also included a compiled version for Windows. Running Mac OS 7 on Raspberry Pi with Color – Novaspirit
This month on Open Apple, we sit down with Glenda Adams, better known on the Apple II as The Atom. She was a cracker of some note back in the 1980s, and she shares great stories with us…
I expect few people to still have a functioning Apple LaserWriter Pro as – despite them bing very solid devices – having them last for almost 25 years is quite a feat.
But I do know many people have machines from the Apple II through Macintosh II era, and that’s what the first manual is about. Some of the contents:
Peripheral Interface Guide rev. Jan 91
Macintosh Family Computers
Introduction 3
Computer Port Locations 4
Computer Ports 6
Modem and Printer Connectors – DE-9 6
Modem and Printer Connectors – Mini DIN-8 7
SCSI Connector (Pins 1-12) 8
SCSI Connector (Pins 13-25) 9
Apple Desktop Bus Connector 10
Keyboard Connector 11
Mouse Connector 11
Audio Input Connector 12
Audio Output Connector – Monaural 12
Audio Output Connector – Stereo 12
External Disk Drive Connector 13
External Video Connector 14
External Video Connector – Macintosh Portable 14
Interface Cards 16
Macintosh Display Cards 4/8, 8/24, 16 and 8/24-GC
Macintosh II High-Resolution and I-bit Monochrome Video Cards 17
Macintosh II Portrait Display and Two-Page Monochrome Monitor Video Cards (Current Version) 18
Macintosh II Portrait Display and TWO-Page Monochrome Monitor Video Cards (Obsolete Version) 19
EtherTalk Interface and EtherTalk NB Cards 20
TokenTalk NB Interface Card 20
Coax/fwinax Interface Card – Coax Connector 21
Coax/fwinax Interface Card – Twinax Connector 21
Serial NB Interface Card (Pins 1-20) 22
Serial NB Interface Card (Pins 21-40) 23
Serial NB Interface Card (Pins 41-62) 24
Apple II Family Computers
Introduction 3
Computer Port Locations 4
Apple IIGS Computer Ports 5
Sound Input/Output Connector 5
Audio Connector 5
Composite Video Connector 5
Modem and Printer Connectors 6
Apple Desktop Bus Connector 6
Disk Drive Connector 7
RGB Video Connector 8
Joystick/Hand Controller Connector 9
Apple lIc/IIc plus Computer Ports 10
Modem and Printer Connectors – Mini DIN-5 10
Modem and Printer Connectors – Mini DIN-8 11
Joystick/Hand Controller/Mouse Connector 12
Video Expansion Connector 13
External Disk Drive Connector 14
Composite Video Connector 15
Audio Connector 15
Power Adapter Connector 15
Apple II/II Plus/lIe Computer Ports 16
Cassette Input Connector 16
Cassette Output Connector 16
Composite Video Connector 17
Auxiliary Video Connector 17
Game Controller Connector 18
Joystick/Hand Controller Connector 19
Apple II Interface Cards 20
Communications Card Pin-outs 20
Super Serial Card Pin-outs 21
Super Serial Card Printer Mode – Switch SW1 22
Super Serial Card Printer Mode – Switch SW2 23
Super Serial Card Communication Mode – Switch SWI 24
Super Serial Card Communication Mode – Switch SW2 25
Serial Interface Card Pin-outs 26
Serial Interface Card Switch Settings 27
Parallel Printer and Centronics Printer Interface Card Pin-outs 28
IEEE-488 Interface Pin-outs 29
Parallel Interface Card Pin-outs 30
Parallel Interface Card Switch Settings 31
Apple II Video Overlay Card Pin-outs 32
Apple II SCSI and High-Speed SCSI Cards Pin-outs 33


[WayBack] RetroMacCast – Where great old Macs live again!


