Thanks for this example: [Archive.is] Grote Lange Dikke Trien on Twitter: “In der Schweiz. “Er wohnt in DER Schweiz” Wo? “Ich fahre in DIE Schweiz” Wohin?… “
–jeroen
Posted by jpluimers on 2022/01/10
Thanks for this example: [Archive.is] Grote Lange Dikke Trien on Twitter: “In der Schweiz. “Er wohnt in DER Schweiz” Wo? “Ich fahre in DIE Schweiz” Wohin?… “
–jeroen

Posted in LifeHacker, Natural Languages, Power User | Leave a Comment »
Posted by jpluimers on 2022/01/10
200 year old topography of The Netherlands:
Hoe zag jouw omgeving er vroeger uit? Kijk nu zelf op Topotijdreis.nl. De website van het Kadaster met kaarten tot 200 jaar oud.
[WayBack/Archive.is] Topotijdreis: 200 jaar topografische kaarten
Via:
–jeroen

Posted in LifeHacker, Power User | Leave a Comment »
Posted by jpluimers on 2022/01/07
Ik had dus gemist dat in oktober 2021 de spelregels rondom een corona herstelbewijs.
De reden is dat de communicatie rondom corona in Nederland niet echt top is.
Het laatste voorbeeld: terwijl boosters voor iedereen van 18 jaar en ouder beschikbaar zijn en sommige vaccinatielocaties inmiddels weer vrije inloop hebben, hebben velen dat in mijn omgeving nog niet aangevraagd, want “ik heb nog geen uitnodiging ontvangen”, en/of “ik wist niet dat het al kon”. Anderen ervaren hetzelfde, dus dit soort berichten zijn belangrijk:
- [Archive] WheelieNick on Twitter: “Die communicatie over de booster moet ECHT beter, Mijn huishoudhulp is hier en vertelt ik heb nog geen booster want nog geen oproep gehad. Ik vertel dat ze op geboortejaar gewoon al mag en ze kijkt me echt verbaasd aan, echt?” / Twitter
- [Archive] Kirsten Verdel on Twitter: “Let op: veel mensen hebben VANDAAG pas hun boosteruitnodigingsbrief ontvangen, terwijl ze uit bijvoorbeeld 1948 of 1949 komen. Die jaren waren rond 10 dec (!) al aan de beurt voor een afspraak. WACHT NIET OP DE BRIEF: plan je afspraak op planjeprik.nl of bel 08007070.” / Twitter
- Boosteren: via [Wayback/Archive] planjeprik.nl of
Terug naar herstelbewijs: de meeste linkjes hieronder zijn namelijk niet van GGDGHOR, RIVM of Rijksoverheid.
De enige GGD website die de communicatie rondom herstelbewijs qua volledigheid en duidelijkheid op orde heeft is GGD zhz (Zuid-Holland Zuid). Complimenten!
Hier de linkjes (via [Wayback/Archive] herstelbewijs corona aanvragen – Google Search):
Herstelbewijs voor als u bij de GGD bent getest
Een herstelbewijs is een bewijs dat u ooit positief getest bent op aanwezigheid van het coronavirus. U vindt op de website van de Rijksoverheid alle eisen voor het aanmaken van een herstelbewijs.Bent u bij de GGD in Nederland positief getest op corona? Dan kunt u uw herstelbewijs in de CoronaCheck-app ophalen. Meer informatie over het ophalen van een herstelbewijs via CoronaCheck.
Herstelbewijs als u niet bij de GGD bent getest
Bent u niet bij de GGD getest en lukt het niet om een herstelbewijs op te halen? Dan kan het zijn dat uw persoonsgegevens niet juist aan de GGD zijn doorgegeven. Vul dan het volgende aanvraagformulier ”Aanvraagformulier corona herstelbewijs voor mensen die niet bij de GGD getest zijn”.
15 okt. 2021
Corona
Ben je positief getest op corona? En was dat niet bij de GGD? Dan kun je nu ook een QR-code op basis van een herstelbewijs ophalen in de CoronaCheck-app.
Elke testaanbieder in Nederland is, sinds we op 1 juni 2020 grootschaliger zijn gaan testen op Covid-19, verplicht om een positieve uitslag aan de GGD door te geven. Tot voor kort was het om technische redenen echter niet mogelijk om een QR-code op te halen als je niet bij de GGD getest was. Dat is het nu wel. De test moet wel tussen de 11 en 180 dagen geleden zijn afgenomen en de positieve uitslag moet op de juiste wijze, door de betrokken arts van de testaanbieder, aan de GGD zijn doorgegeven.
–jeroen
Posted in Covid-19/SARS-CoV-2/Coronavirus, Health, Power User, Vaccinations | Leave a Comment »
Posted by jpluimers on 2022/01/06

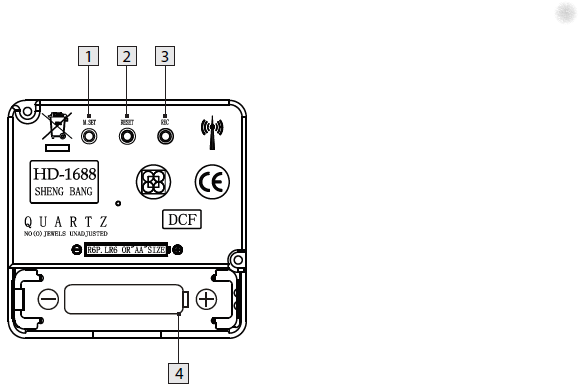
Model 100489-14-01 wall clock
Just in case I need it again.
The signal quality fluctuates during the day (it is a lot better at night when there is less inionisation in the atmosphere), and is worsened by concrete walls (like our home).
Best way to get prolonged reception is at night, on the top floor behind a window or outside.
The clock usually needs between 3 and 10 minutes to pick up the DCF77 signal from the transmitter.
Wall clock manual: [Wayback] 100489_EN.pdf of which this abstract:
DCF77 HD-1688 clock mechanism
Numbers:
- M.SET button
- Press and keep pressed the M.SET button 1 at least 3 seconds. The wall clock switches into manual mode.
- Press and keep pressed the M.SET button again until the hands reach the correct position for you to set the time.
- Briefly pressing the M.SET button moves the hands forward in one minute steps to enable you to set the current time manually.
Note: After 8 seconds without pressing the M.SET button, the wall clock switches out of manual mode and keeps the time as normal. The manually set value is overwritten as soon as reception of the DCF radio time signal is successful.- RESET button
- Press the RESET button 2 to reset the radio clock settings. Alternatively, remove the batteries from the device and insert them again.
- The product now automatically starts to search for the DCF radio time signal.
- REC button
- Press and keep pressed the REC button 3 at least 5 seconds. The wall clock attempts to receive the DCF radio time signal. This process takes a few minutes to complete.
- Battery compartment
- Battery type: 1 x 1.5 V ⎓ AA, LR6
More on the signal, transmitter and encoding: DCF77 – Wikipedia, where the below images are from:
DCF77 reception area from Mainflingen
DCF77 signal strength over a 24-hour period measured in Nerja, on the south coast of Spain 1,801 km (1,119 mi) from the transmitter. Around 1 AM it peaks at ≈ 100 µV/m signal strength. During the day, the signal is weakened by ionization of the ionosphere due to solar activity.
Another DCF77 clock I have: CSL Bearware 302658 DCF clock manual
–jeroen

Posted in Development, Encoding, Hardware Development, LifeHacker, Power User, Software Development | 2 Comments »
Posted by jpluimers on 2022/01/05
TL;DR: recurrence in Google Calendar can be tough.
Adding a yearly repeating event on a last weekday (where weekday is any day of the week: sunday, monday, etc) of a month in Google Calendar was a lot less obvious than I hoped for.
The easiest path “Custom Event” by default does not show last/#th/first, only a fixed date when selecting yearly or monthly repeating events, which is contrary to the suggested answer at [Wayback/Archive.is] Google calendar question: How to set an event to repeat on the first Monday of a specific Month : google:
Create an event on September 3rd. Choose custom recurrence. Repeat every 12 months monthly on the first Monday. I just tested that out on the browser version of Google calendar
The trick is to first select a normally repeating monthly event on the last#th/first weekday day of a month.
Note that for the 5th week, you cannot do this in the Google Calendar UI as per [Wayback] google calendar – Schedule an event for last Sunday (or another day of week) of each month – Web Applications Stack Exchange:
If you actually want a day on the 5th week of every month (versus the last week), the Google Calendar UI does not support this, but you can do it by importing an .ics file
Below is an example while writing this: adding a yearly recurring event on the last Sunday of May (which in 2021 was Sunday the 30th of May).
These are the steps:

Posted in Google, GoogleCalendar, LifeHacker, Power User | Leave a Comment »
Posted by jpluimers on 2022/01/05
Even when young, this transcript should raise all the red flags:
- Recruiter: At this job, you will get to work at a fast paced environment.
- Recruiter: You will get to thrive under pressure.
- Recruiter: And you will be part of a dynamic team.
- Applicant: Great, new that you’ve outlined the cons, what are the pros?
[Archive.is] Work Chronicles | Comics about Work on Twitter: “Fast-paced Environment… “ and [Wayback] Fast-paced Environment | Work Chronicles:
–jeroen

Posted in About, Development, LifeHacker, Personal, Power User, Software Development | Leave a Comment »
Posted by jpluimers on 2022/01/04
[Wayback] Valetudo | Cloud-free control webinterface for vacuum robots
Valetudo is a standalone binary which runs on rooted Vacuums of the Xiaomi ecosystem and aims to enable the user to operate the robot vacuum without any Cloud Connection whatsoever.
You can even use it to make a WiFi heat map of the floors in your home: the Valeroni app can do that for you.
The Valeroni app is open source too: [Wayback/Archive.is] ccoors/Valeronoi: A WiFi mapping companion app for Valetudo
Via [Archive.is] Kristian Köhntopp on Twitter: “Paging @sys_adm_ama: … Alternative Firmware für Robot-Staubsauger … Alternative Firmware für Robot-Staubsauger verwenden, um das Wifi im Haus zu mappen (und Staub zu saugen)”
–jeroen

Posted in C++, Development, Hardware, LifeHacker, Power User, Software Development, WiFi | Leave a Comment »
Posted by jpluimers on 2022/01/03
During the 2020 Covid Crisis, many health providers moved over from in-person consults to web based consults.
One party providing these was (is?) Webcamconsult.
They indicate it works with Chrome. It did not work with Chrome on MacOS:
This gives me a feeling that they hardly tested on MacOS at all.
My major gripes:
Some links in case anyone is still interested:
Webcam doesn’t work
It can sometimes happen that your webcam does not work. In the case of Windows computers this will have to do with the fact that the webcam is blocked by something. Check the Microsoft support page about webcam settings on Windows 10:
https://support.microsoft.com/en-us/help/13753/windows-10-camera-does-not-work
Yes you can test your network connection, webcam and microphone anytime here
Test network
Network test
This test will check the bandwidth and quality of your network. when you press ‘start test’, your webcam will be launched and we’ll connect to a test server. You might be asked to give permission to use the webcam.
Then we will test the connection for 15 seconds and measure the amount of date exchanged per second (in kilobytes), we also check if all packets arrive on your computer and the server and measure failed attempts (packet-loss)Note that Network environment may change, this test only gives an indiciation of your current bandwidth and loss.
The connection usually improves over time as it gets more stable; the average should therefor be lower then the last measurement, please keep a number in mind that is between the average and the last measurement
For an audio/video connection you need at least 60Kb/s in total bandwidth and less then 0.5% packet loss /s
For optimal performance for your webcamconsult requires over 120Kb/s in total and less then 0.3% packet-loss
Start Network test
Hardware test
With this test you can check your hardware (webcam and microphone). When you start the test, a screen will appear where you should see yourself through the webcam. A volume indicater, indicates the volume measured over the selected audio input device.
If you have multiple input devices, you will be able to select the one you want to use
Start Hardware test
Some screenshots below the fold.
–jeroen

Posted in LifeHacker, Power User | Leave a Comment »
Posted by jpluimers on 2021/12/31
–jeroen
Posted in LifeHacker, Power User | Leave a Comment »
Posted by jpluimers on 2021/12/30
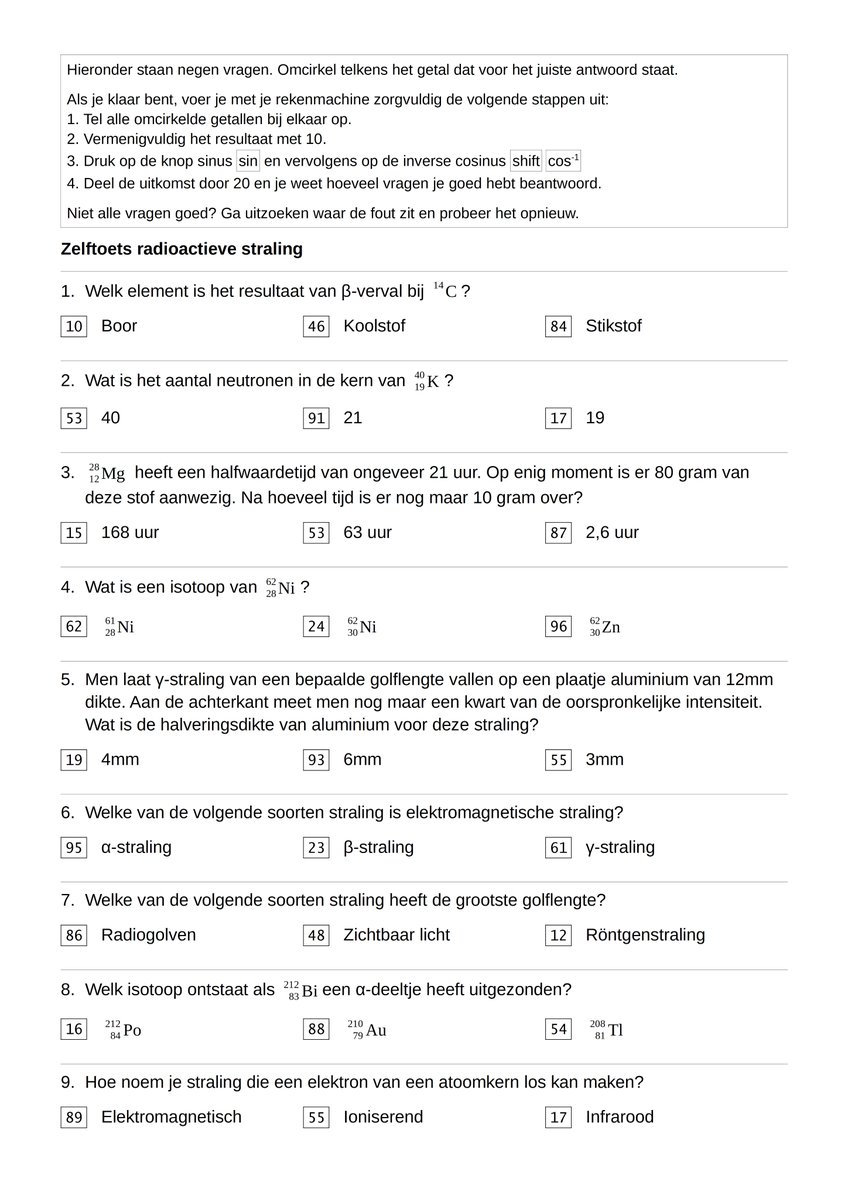
[Archive.is] Martijn Leisink on Twitter: “Soms wil je leerlingen een zelftoets laten maken. Je wil dat ze die zelf na kunnen kijken, maar tegelijkertijd wil je juist niet dat ze meteen de antwoorden op kunnen zoeken. Dat lijkt tegenstrijdig, maar er is een manier! (Ter inspiratie voor andere bèta-docenten.)… “
Thread: [Wayback] Thread by @mleisink on Thread Reader App – Thread Reader App
Truc: [Archive.is] Harry de Jonge on Twitter: “In eerste instantie 8 van de 9 goed. Uit de formule volgt dat ‘t te behalen totaal aantal punten n x 360 – 90 moet zijn, met behulp daarvan bepaald dat ik vraag 8 fout had. Ergens 2 of 4 van aftrekken is nog lastig😀 Natuurkunde is toegepaste wiskunde.… “
Zelf maken: [Archive.is] http://zelftoets.wiskunstelaar.nl/
Maak een aantal vragen met telkens drie antwoordopties.
Zet de getallen in de tabel hierboven voor de antwoorden.
Een leerling kan met het volgende recept controleren hoeveel antwoorden hij goed heeft:
- Tel de getallen voor het antwoord van jouw keus bij elkaar op.
- Vermenigvuldig het resultaat met 10.
- Druk op de knop sinus en vervolgens op de inverse cosinus.
- Deel de uitkomst door 20 en je weet hoeveel vragen je goed hebt beantwoord.
Leerlingen kunnen dus wel achterhalen hoeveel antwoorden ze goed hebben, maar niet welke antwoorden goed zijn.
Let er overigens op dat de rekenmachine op graden moet staan en niet op radialen!
–jeroen

Posted in Learning/Teaching, LifeHacker, Power User | Leave a Comment »