Archive for the ‘ESXi6.5’ Category
Posted by jpluimers on 2019/03/29
When connecting from my Mac to my ESXi rig, some commands (especially less) show this output:
WARNING: terminal is not fully functional
So I created this alias to connect from my Mac to the internal address of my ESXi rig:
alias ssh-esxi-X10SRH-CF-internal='TERM=xterm ssh -p 22 root@192.168.71.91'
The trick is the bold part: TERM=xterm (which you can also replace by export TERM=xterm; if you want future ssh sessions to use the same [wayback] TERM setting).
The reason is that the Mac defines the TERM variable as containing xterm-256 which is defined on the Mac itself, but ESXi has a hard time coping with it.
Some Mac OS and Xcode combinations had a problem with xterm-256 not being present ([WayBack] macos – Terminal strangeness after installing Xcode on Lion – Super User), but this isn’t the case on my system:
$ ls -alh `find /usr/share/terminfo | grep 'xterm-256color'`

-rw-r--r-- 1 root wheel 3.2K Jul 30 2016 /usr/share/terminfo/78/xterm-256color
On the Mac you really want to use xterm-256color as it looks way better than xterm-color or xterm: [WayBack] linux – What is the difference between xterm-color & xterm-256color? – Stack Overflow (thanks [WayBack] Chris Page!)
It seems I already did something similar on ESXi itself to get esxtop working: ESXi: when esxtop shows garbage. That was on the ESXi side and works as well for this problem too.
However, it is a bit harder to have a script run during ESXi boot time that sets this, so it is easier to fix this on the Mac side.
It works for all OS X and ESXi versions I’ve tested so far.
–jeroen
Posted in *nix, Apple, ESXi5.1, ESXi5.5, ESXi6, ESXi6.5, iMac, Mac, Mac OS X / OS X / MacOS, Mac OS X 10.4 Tiger, Mac OS X 10.5 Leopard, Mac OS X 10.6 Snow Leopard, Mac OS X 10.7 Lion, MacBook, MacBook Retina, MacBook-Air, MacBook-Pro, MacMini, macOS 10.12 Sierra, OS X 10.10 Yosemite, OS X 10.11 El Capitan, OS X 10.8 Mountain Lion, OS X 10.9 Mavericks, Power User, Virtualization, VMware, VMware ESXi | Leave a Comment »
Posted by jpluimers on 2019/03/25
No Google results for “balloonVMCI loaded successfully”.
I had this when booting from a USB installation of ESXi 6.5.0.a.
It got resolved with ESXi 6.5.0 Update 1. Apparently the first version has issues booting on a SuperMicro-X10SRH-CF from a USB stick.
It’s a bit tricky to get the accompanying VMware-VMvisor-Installer-6.5.0.update01-5969303.x86_64.iso as the my VMware site is a bit broken (even if you have the license, it says you are not entitled), but luckily the ESXi 6.5 update 1 download page [Cache/Archive.is] has the hashes:
MD5SUM: 6d71ca1a8c12d73ca75952f411d16dc7
SHA1SUM: 5a38ae10162e0a1395b12ea31cba6342796f6383
SHA256SUM: f6e5000dff423c275b3ffbdfe08145f369d04b8c4ade5a413f2ef2a029a5e3ef
You also need a good USB stick. If it’s not good enough, you get errors like “Host Local Swap Location has not been enabled” during boot**.
–jeroen
** full log at for instance [WayBack] 2017-02-03T03:00:01Z crond[66604]: crond: USER root pid 87677 cmd /usr/lib/vmwar – Pastebin.com
Posted in ESXi6.5, Mainboards, Power User, SuperMicro, Virtualization, VMware, VMware ESXi, X10SRH-CF | Leave a Comment »
Posted by jpluimers on 2019/03/21
Interesting way to keep your ESXi rug up to date:
[WayBack] Keep track of VMware ESXi patches, subscribe by RSS, Twitter and E-Mail! – Brought to you by @VFrontDe: VMware ESXi 6.5.0 Patch History.
There is an RSS feed: http://feeds.feedburner.com/Esxi650PatchTracker and in depth information at [WayBack] VMware ESXi Patch Tracker – Help.
Clicking on the link next to Imageprofile will popup a screen with instructions how to upgrade your ESXi box to that level, for instance:
# Cut and paste these commands into an ESXi shell to update your host with this Imageprofile

# See the Help page for more instructions

#

esxcli network firewall ruleset set -e true -r httpClient

esxcli software profile update -p ESXi-6.5.0-20170702001-standard \

-d https://hostupdate.vmware.com/software/VUM/PRODUCTION/main/vmw-depot-index.xml

esxcli network firewall ruleset set -e false -r httpClient

#

# Reboot to complete the upgrade
I wish there was a similar thing for [WayBack] ESXi Embedded Host Client as I could not find any of the esxui VIB files mentioned there at esxui site:https://esxi-patches.v-front.de.
By the time you read this I really hope these two esxui things have been fixed:
–jeroen
Posted in ESXi6.5, Power User, Virtualization, VMware, VMware ESXi | Leave a Comment »
Posted by jpluimers on 2019/03/14
One more article about differences between the old C# Windows vSphere Client and “new” vSphere HTML5 Web Client in ESXi 6.5 and up.
This time about changing the startup/shutdown sequence so automatically power on and power off virtual machines.
In the old C# Windows vSphere Client, this was at the host level in the configuration tab under Virtual Machine Startup/Shutdown. There you click on Properties, then adjust the order by moving them up and down (screenshots and more detailed instructions are at ESX(i) AutoStart virtual machines: how to change the VM startup/shutdown settings (via: VMware Communities)).
In the vSphere HTML5 Web Client, there are two bits for this:
On the server you need to enable AutoStart:
From: 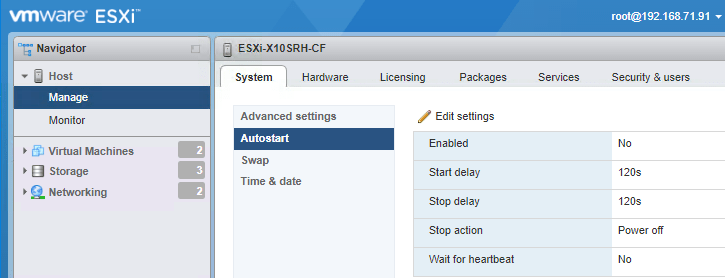
 to:
to: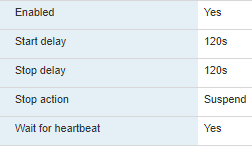

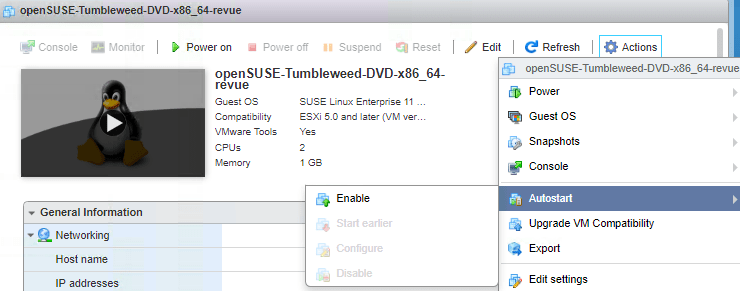
For each VM you have to enable AutoStart, then determine the order
- In the left, select the VM
- In the right, choose
Actions, then Autostart, then Enable:

- Enable the columns in the VM overview:
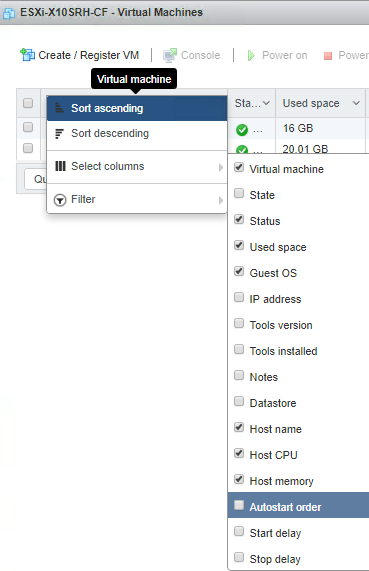

- Order 1 means highest; adjust accordingly for each VM:


If after boot you get a “Failed – The operation is not allowed in the current state.“, then your machine still is in maintenance mode.
–jeroen
Related: ESXi 6.5: change the host name in the “new” vSphere HTML5 Web Client, or using DHCP option 12 « The Wiert Corner – irregular stream of stuff
Posted in ESXi6.5, Power User, Virtualization, VMware, VMware ESXi | Leave a Comment »
Posted by jpluimers on 2019/03/13
Reminder to self when checking “new” disks to see what partitions they contain before formatting them as VMFS.
There is a truckload information at [WayBack] Using the partedUtil command line utility on ESXi and ESX (1036609) | VMware KB.
A few tips; example output is further below:
- Disks are listed under
/vmfs/devices/disks/ where there are two entries per device: a path leading to the device, and a link to that path which starts with vml. which I filter out with grep.
- If a disk under under
/vmfs/devices/disks/ ends with :# where # is a number, then it is a partition
- Just skip
partedUtil get as partedUtil getptblwill give you exactly the same information,
- plus an extra initial line indicating what kind of partition table it is. KB 1036609 has a longer list, but these are the ones you usually see:
unknown: the disk has no partition table yet (usually), or the type of partition table cannot be determined (hardly)gpt: there is a GUID Partition Tablemsdos: there is a Master Boot Record partition table
- on ESXi 6.x two extra columns listing the partition GUID and partition type description
- The output of
partedUtil is unformatted, which means it is easy to parse, but hard to read for humans. You can pipe through sed 's/ /\t/g' (as there is no tr on the ESXi busybox)
Some more background reading
On scripting:
- The shell is
sh (always been there)
- There is
Python (ESXi 5.1 has Python 2.7.8; ESXi 6.5 has Python 3.5.3; it has likely been available in earlier versions too).
On device names:
On errors:
-
~ # find /vmfs/devices/disks/ | grep T1500LM0032D9YH148

/vmfs/devices/disks/t10.ATA_____ST1500LM0032D9YH148__________________________________Z110C4Q0a

~ # partedUtil getptbl /vmfs/devices/disks/t10.ATA_____ST1500LM0032D9YH148__________________________________Z110C4Q0

unknown

182401 255 63 2930277168

~ #
I know of three VMFS types:
- VMFS-3: Supported in ESXi 3.X, 4.X, 5.x & 6.x; deprecated as of 6.0 (cannot be created as of 6.0), has quite some limitations.
- VMFS-4: got never released.
- VMFS-5: Can be converted from VMFS-3
- VMFS-6: Cannot be converted from other VMFS types
Some interesting links about the various VMFS types:
Busybox has been updated over time:
Examples and output
Example outputs on one of my systems, of which I stripped most of the disks as they’re not really relevant here.
[root@ESXi-X10SRH-CF:~] ls -1 /vmfs/devices/disks/ | grep -v '^vml\.'
naa.5000c50087762d1b
...
naa.600605b00aa054a0ff000021022683ae
naa.600605b00aa054a0ff000021022683ae:1
...
t10.ATA_____ST1500LM0032D9YH148__________________________________Z110C4Q0
t10.ATA_____Samsung_SSD_850_PRO_2TB_________________S2KMNCAGB04321L_____
t10.ATA_____Samsung_SSD_850_PRO_2TB_________________S2KMNCAGB04321L_____:1
...
t10.SanDisk00Ultra_Fit000000000000004C530001240406103372
t10.SanDisk00Ultra_Fit000000000000004C530001240406103372:1
t10.SanDisk00Ultra_Fit000000000000004C530001240406103372:5
t10.SanDisk00Ultra_Fit000000000000004C530001240406103372:6
t10.SanDisk00Ultra_Fit000000000000004C530001240406103372:7
t10.SanDisk00Ultra_Fit000000000000004C530001240406103372:8
t10.SanDisk00Ultra_Fit000000000000004C530001240406103372:9
[root@ESXi-X10SRH-CF:~] partedUtil getptbl /vmfs/devices/disks/t10.ATA_____ST1500LM0032D9YH148__________________________________Z110C4Q0
unknown
182401 255 63 2930277168
[root@ESXi-X10SRH-CF:~] partedUtil get /vmfs/devices/disks/t10.ATA_____ST1500LM0032D9YH148__________________________________Z110C4Q0
182401 255 63 2930277168
[root@ESXi-X10SRH-CF:~] partedUtil get /vmfs/devices/disks/t10.ATA_____SAMSUNG_MZHPV512HDGL2D00000______________S1X1NYAGB09589______
62260 255 63 1000215216
1 2048 1000214527 0 0
[root@ESXi-X10SRH-CF:~] partedUtil getptbl /vmfs/devices/disks/t10.ATA_____SAMSUNG_MZHPV512HDGL2D00000______________S1X1NYAGB09589______
gpt
62260 255 63 1000215216
1 2048 1000214527 AA31E02A400F11DB9590000C2911D1B8 vmfs 0
[root@ESXi-X10SRH-CF:~] partedUtil getptbl /vmfs/devices/disks/t10.SanDisk00Ultra_Fit000000000000004C530001240406103372
gpt
3738 255 63 60062500
1 64 8191 C12A7328F81F11D2BA4B00A0C93EC93B systemPartition 128
5 8224 520191 EBD0A0A2B9E5443387C068B6B72699C7 linuxNative 0
6 520224 1032191 EBD0A0A2B9E5443387C068B6B72699C7 linuxNative 0
7 1032224 1257471 9D27538040AD11DBBF97000C2911D1B8 vmkDiagnostic 0
8 1257504 1843199 EBD0A0A2B9E5443387C068B6B72699C7 linuxNative 0
9 1843200 7086079 9D27538040AD11DBBF97000C2911D1B8 vmkDiagnostic 0
[root@ESXi-X10SRH-CF:~] partedUtil get /vmfs/devices/disks/t10.SanDisk00Ultra_Fit000000000000004C530001240406103372
3738 255 63 60062500
1 64 8191 0 128
5 8224 520191 0 0
6 520224 1032191 0 0
7 1032224 1257471 0 0
8 1257504 1843199 0 0
9 1843200 7086079 0 0
[root@ESXi-X10SRH-CF:~] partedUtil getptbl /vmfs/devices/disks/t10.SanDisk00Ultra_Fit000000000000004C530001240406103372 | sed 's/ /\t/g'
gpt
3738    255 63  60062500
1   64  8191    C12A7328F81F11D2BA4B00A0C93EC93B    systemPartition 128
5   8224    520191  EBD0A0A2B9E5443387C068B6B72699C7    linuxNative 0
6   520224  1032191 EBD0A0A2B9E5443387C068B6B72699C7    linuxNative 0
7   1032224 1257471 9D27538040AD11DBBF97000C2911D1B8    vmkDiagnostic   0
8   1257504 1843199 EBD0A0A2B9E5443387C068B6B72699C7    linuxNative 0
9   1843200 7086079 9D27538040AD11DBBF97000C2911D1B8    vmkDiagnostic   0
[root@ESXi-X10SRH-CF:~] partedUtil get /vmfs/devices/disks/t10.SanDisk00Ultra_Fit000000000000004C530001240406103372 | sed 's/ /\t/g'
3738    255 63  60062500
1   64  8191    0   128
5   8224    520191  0   0
6   520224  1032191 0   0
7   1032224 1257471 0   0
8   1257504 1843199 0   0
9   1843200 7086079 0   0
[root@ESXi-X10SRH-CF:~] partedUtil --help
Usage:
 Get Partitions : get
 Set Partitions : set  ["partNum startSector endSector type attr"]*
 Delete Partition : delete
 Resize Partition : resize
 Get Partitions : getptbl
 Set Partitions : setptbl   ["partNum startSector endSector type/guid attr"]*
 Fix Partition Table : fix
 Create New Label (all existing data will be lost): mklabel
 Show commonly used partition type guids : showGuids
 Get usable first and last sectors : getUsableSectors
 Fix GPT Table interactively : fixGpt

[root@ESXi-X10SRH-CF:~] partedUtil showGuids
 Partition Type       GUID
 vmfs                 AA31E02A400F11DB9590000C2911D1B8
 vmkDiagnostic        9D27538040AD11DBBF97000C2911D1B8
 vsan                 381CFCCC728811E092EE000C2911D0B2
 virsto               77719A0CA4A011E3A47E000C29745A24
 VMware Reserved      9198EFFC31C011DB8F78000C2911D1B8
 Basic Data           EBD0A0A2B9E5443387C068B6B72699C7
 Linux Swap           0657FD6DA4AB43C484E50933C84B4F4F
 Linux Lvm            E6D6D379F50744C2A23C238F2A3DF928
 Linux Raid           A19D880F05FC4D3BA006743F0F84911E
 Efi System           C12A7328F81F11D2BA4B00A0C93EC93B
 Microsoft Reserved   E3C9E3160B5C4DB8817DF92DF00215AE
 Unused Entry         00000000000000000000000000000000
[root@ESXi-X10SRH-CF:~] cat /local/bin/what-is-my-shell.sh
if test -n "$ZSH_VERSION"; then
  PROFILE_SHELL=zsh
elif test -n "$BASH_VERSION"; then
  PROFILE_SHELL=bash
elif test -n "$KSH_VERSION"; then
  PROFILE_SHELL=ksh
elif test -n "$FCEDIT"; then
  PROFILE_SHELL=ksh
elif test -n "$PS3"; then
  PROFILE_SHELL=unknown
else
  PROFILE_SHELL=sh
fi
echo $PROFILE_SHELL
echo $SHELL
[root@ESXi-X10SRH-CF:~] /local/bin/what-is-my-shell.sh
sh
/bin/sh
[root@ESXi-X10SRH-CF:~] python --version
Python 3.5.3
[root@ESXi-X10SRH-CF:~]
–jeroen
Posted in Development, ESXi4, ESXi5, ESXi5.1, ESXi5.5, ESXi6, ESXi6.5, Power User, Software Development, Virtualization, VMware, VMware ESXi | Leave a Comment »
Posted by jpluimers on 2019/03/12
Steps to get it working on ESXi 6.x with p7zip 16.02:
- Copy the output of https://sourceforge.net/projects/p7zip/files/p7zip/16.02/p7zip_16.02_x86_linux_bin.tar.bz2/download to a place where you can reach it through http (as
wget on ESXi does not understand https)
- Follow the script below
mkdir -p /local/bin

cd /local bin

wget http://192.168.71.62/esxi/netcologne.dl.sourceforge.net/project/p7zip/p7zip/16.02/p7zip_16.02_x86_linux_bin.tar.bz2

bzip2 -d p7zip_16.02_x86_linux_bin.tar.bz2

mv p7zip_16.02/bin/7z* .

chmod 755 7z 7za 7zra
Based on much longer steps involving Windows and an older version of p7zip: 7zip on ESXi through p7zip.
–jeroen
Posted in 7zip, Compression, ESXi4, ESXi6, ESXi6.5, Power User, Virtualization, VMware, VMware ESXi | Leave a Comment »
Posted by jpluimers on 2019/03/06
With the removal of the C# based Windows vSphere Client in ESXi 6.5, the vSphere HTML5 Web Client is the way to go.
It doesn’t cover all functionality yet, and some functionality is in different places in the UI, so below the steps to change the hostname.
Since I prefer a central location of name and address management, I’ve also documented on how to do this with DHCP option 12.
Oh: I’m not alone in finding the changed place
Before I begin, some background reading on DHCP Options as I plan to do more with that in the future:
Read the rest of this entry »
Posted in Development, ESXi6.5, Power User, RouterOS, Scripting, Software Development, Virtualization, VMware, VMware ESXi | Leave a Comment »
Posted by jpluimers on 2019/03/05
VMware and USB sticks have two aspects:
- Creating an installable USB stick
- Boot from it and install on another USB stick
Some motherboard and servers offer an internal USB socket to plug in the second stick.
If not, search for “usb 3” motherboard header adapter “usb a”.
Getting the ISO installer on a USB stick to install from
- Download Rufus (I’ve used the portable version from)
- Run Rufus, select ISO image type

- Choose the image (the button on the right of the image type), in my case
VMware-VMvisor-Installer-201701001-4887370.x86_64.iso from https://my.vmware.com/group/vmware/evalcenter?p=free-esxi6 which Rufus recognises as ESXI-6.5.0-20170104001-STANDARD:

- Confirm the menu file replacement (note they forgot to translate the
Ja button to Yes and Nee to No):

---------------------------
Replace menu.c32?
---------------------------
This ISO image seems to use an obsolete version of 'menu.c32'.
Boot menus may not display properly because of this.

A newer version can be downloaded by Rufus to fix this issue:
- Choose 'Yes' to connect to the internet and download the file
- Choose 'No' to leave the existing ISO file unmodified
If you don't know what to do, you should select 'Yes'.

Note: The new file will be downloaded in the current directory and once a 'menu.c32' exists there, it will be reused automatically.
---------------------------
Ja Nee
---------------------------
- If you get this, then just choose
No in the previous dialog:

---------------------------

File download

---------------------------

Unknown internet error 0x00002F0D

---------------------------

OK

---------------------------
- Confirm erasure of the USB device data (here the
Cancel button is still Dutch Annuleren:

---------------------------

Rufus

---------------------------

WARNING: ALL DATA ON DEVICE 'NO_LABEL (F:) [4.1GB]' WILL BE DESTROYED.

To continue with this operation, click OK. To quit click CANCEL.

---------------------------

OK Annuleren

---------------------------
Installing from the USB based installer onto another target USB stick
Yes, you need a second USB to install onto. Which means that it’s best if the two sticks are different models or different brands so it is easier to set them apart.
- Insert both sticks in your machine
- Power on the machine and go into BIOS settings
- Boot from the first
Posted in ESXi6, ESXi6.5, Power User, Virtualization, VMware, VMware ESXi | Leave a Comment »
Posted by jpluimers on 2019/03/01
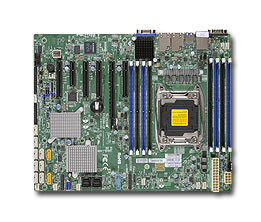 I still like this board: [WayBack] Supermicro | Products | Motherboards | Xeon® Boards | X10SRH-CF.
It’s in my main virtualisation workhorse, uses little power, has loads of disk (SAS/SATA) ports, IPMI, two network connections and enough slots for memory and I/O to be extensible.
I use it for most of my software development even when on the road: VPN home over one of the fiber connections and it screams.
Some links, as SuperMicro tends to hide them behind POST requests:
–jeroen
Posted in Development, ESXi6.5, Hardware, Mainboards, Power User, Software Development, SuperMicro, Virtualization, VMware, VMware ESXi, X10SRH-CF | Leave a Comment »


