The Wiert Corner – irregular stream of stuff

Jeroen W. Pluimers on .NET, C#, Delphi, databases, and personal interests

  • My badges

  • Twitter Updates

  • My Flickr Stream

  • Pages

  • All categories

  • Enter your email address to subscribe to this blog and receive notifications of new posts by email.

    Join 1,835 other subscribers

Archive for the ‘ESXi6’ Category

NVMe and SATA health data on ESXi: some links to investigate

Posted by jpluimers on 2021/08/25

(Edit 20221202: added one more link on “REALLOCATED SECTOR CT below threshold”)

Somehow, health data of my NVMe and SATA drives do not show up as health information on the web-ui of my ESXi playground rig.

So far, I noticed that ESXi runs a smartd, but does not ship with a smartctl, nor health data ends up in the web user interface. So you cannot see the state of NVMe and SATA devices easily.

Still these devices deteriorate over time and afterwards die, so below are some links to investigate later.

Goal is to use my own thresholds to set warning and error levels.

Some log entries:

Read the rest of this entry »

Posted in *nix, *nix-tools, ESXi6, ESXi6.5, Power User, PowerCLI, smartmontools/smartctl/smartd, Virtualization, VMware, VMware ESXi | Leave a Comment »

The curious Kabri | How to force VMware to generate a new MAC address for a virtual machine

Posted by jpluimers on 2021/08/06

[WayBack] The curious Kabri | How to force VMware to generate a new MAC address for a virtual machine

  1. Shut down the Guest OS.
  2. Open up the .vmx file.
  3. Delete the following lines (that begin with…):
    ethernet0.addressType
    uuid.location =
    uuid.bios =
    ethernet0.generatedAddress =
    ethernet0.generatedAddressOffset =
  4. Boot up the Guest OS again, and it should generate new details in the vmx file (I’d check afterwards to be doubly sure).

In my experience, start with the bold values.

If the address is the same, fiddle with ethernet0.generatedAddressOffset

Be careful with the other values, as it might force your OS to think so much hardware has changed, that license keys have become invalid.

Via: [WayBack] Re-generate MAC addresses for VMs |VMware Communities

Related:

–jeroen

Posted in ESXi6, ESXi6.5, ESXi6.7, Power User, Virtualization, VMware, VMware ESXi | Leave a Comment »

Keeping your ESXi infrastructure up-to-date: Subscribe to VMware ESXi Patch Tracker RSS Feed

Posted by jpluimers on 2021/06/29

[WayBack] Subscribe to VMware ESXi Patch Tracker RSS Feed has all the post-feedburner (see below) RSS links in a nice table:

Subscribe to VMware ESXi Patch Tracker RSS Feed

For popular web based readers:
Feedly [All] [6.7] [6.5] [6.0] [5.5] [5.1] [5.0]
My Yahoo! [All] [6.7] [6.5] [6.0] [5.5] [5.1] [5.0]
netvibes [All] [6.7] [6.5] [6.0] [5.5] [5.1] [5.0]
For manual subriptions with other web based or offline readers copy-and-paste these links:
manual [All] [6.7] [6.5] [6.0] [5.5] [5.1] [5.0]

Post-feedburner

Parts of feedburner have been deprecated since 2012: FeedBurner – Wikipedia.

There are all sorts of reports of feedburner being unstable, for instance:

–jeroen

Posted in ESXi5, ESXi5.1, ESXi5.5, ESXi6, ESXi6.5, ESXi6.7, Power User, Virtualization, VMware, VMware ESXi | Leave a Comment »

How to rename a VM through SSH on ESXi ? |VMware Communities

Posted by jpluimers on 2021/06/28

From [WayBack] How to rename a VM through SSH on ESXi ? |VMware Communities (numbering and code highlighting mine):

Kindly find the below:

  1. Backup the virtual machine
  2. Power down the virtual machine
  3. Remove the virtual machine from the vSphere host inventory
  4. Open an SSH console session to the vSphere host
  5. Navigate to the storage directory containing the virtual machine: For example: cd /vmfs/volumes/<datastore_name>/<original_vmname>
  6. Rename the primary .vmdk configuration files: vmkfstools -E "<original_vmname>.vmdk" "<new_vmname>.vmdk"
  7. Rename the .vmx configuration file: mv "original_vmname.vmx" "new_vmname.vmx"
  8. Edit the virtual machine .vmx configuration file (Be sure to properly update the directory and file name of the .vswp swap file reference): vi "new_vmname.vmx"
  9. Rename any remaining files in the virtual machine’s folder as needed:
    1. Rename the .vmxf configuration file: mv "original_vmname.vmxf" "new_vmname.vmxf"
    2. Rename the .nvram configuration file: mv "original_vmname.nvram" "new_vmname.nvram"
    3. Rename the .vsd configuration file: mv "original_vmname.vsd" "new_vmname.vmsd"
  10. Rename the virtual machine folder: Move up one directory level to the parent folder ( cd .. ) then rename the virtual machine directory: mv "original_directory" "new_directory"
  11. Add the newly-named virtual machine to the host’s inventory (the newly renamed .vmx configuration file)
  12. Power on the newly renamed virtual machine
  13. Answer “I moved it” to the virtual machine question prompt (not “I copied it”)
  14. Review the virtual machine and all files/folders to make sure it is named as desired and functioning properly

Note: There are other methods to allow for renaming, but this method is fairly quick and easy. It should work on all editions of vSphere from free to Enterprise Plus.

The “Answer question” prompt where you should selected “I moved it”:

->

Prompt with symlink names in the path

On a site note, I need to figure uit how to set the ESXi shell prompt to show the current path like pwd does (with symlink names in it instead of the followed symlink targets):

[root@ESXi-X9SRI-3F:~] cd /vmfs/volumes/EVO860_250GB/
[root@ESXi-X9SRI-3F:/vmfs/volumes/5c9bd516-ef1f6d4c-f1b1-0025907d9d5c] pwd
/vmfs/volumes/EVO860_250GB

The ESXi shell is based on busybox, in fact it uses the ash variety:

[root@ESXi-X9SRI-3F:/vmfs/volumes/5c9bd516-ef1f6d4c-f1b1-0025907d9d5c] `readlink -f \`which readlink\`` | grep ^BusyBox
BusyBox v1.29.3 (2018-11-02 15:37:50 PDT) multi-call binary.
BusyBox is copyrighted by many authors between 1998-2015.
[root@ESXi-X9SRI-3F:/vmfs/volumes/5c9bd516-ef1f6d4c-f1b1-0025907d9d5c] type chdir
chdir is a shell builtin

This seemed to work fine:

[root@ESXi-X9SRI-3F:/vmfs/volumes/5c9bd516-ef1f6d4c-f1b1-0025907d9d5c] PS1="[\u@\h:`pwd`] "
[root@ESXi-X9SRI-3F:/vmfs/volumes/EVO860_250GB] 

But in faxt fails, as it only takes a pwd value once, and not every time the prompt is evaluated:

[root@ESXi-X9SRI-3F:/vmfs/volumes/EVO860_250GB] cd ..
[root@ESXi-X9SRI-3F:/vmfs/volumes/EVO860_250GB] pwd
/vmfs/volumes
[root@ESXi-X9SRI-3F:/vmfs/volumes/EVO860_250GB] 

So I need to re-visit these links:

–jeroen

Posted in *nix, *nix-tools, BusyBox, ESXi6, ESXi6.5, ESXi6.7, Power User, Virtualization, VMware, VMware ESXi | Leave a Comment »

esxi what is my ip – Google Search

Posted by jpluimers on 2021/06/25

[Archive.is] esxi what is my ip – Google Search:

esxcli network Commands
Command Description
network ip dns server remove Remove a DNS server from the list of DNS servers to use for this ESXi host.
network ip get Get global IP settings
network ip interface add Add a new VMkernel network interface.
network ip interface ipv4 get Get IPv4 settings for VMkernel network interfaces.

60 more rows

More columns and rows of that table in

[WayBack] vSphere Documentation Center: vSphere 5 Command Line Documentation > vSphere Command-Line Interface Documentation > vSphere Command-Line Interface Reference: esxcli network Commands

Not much has changed since, so this still works:

[root@ESXi-X9SRI-3F:/] esxcli network ip interface ipv4 get
Name  IPv4 Address   IPv4 Netmask   IPv4 Broadcast  Address Type  Gateway       DHCP DNS
----  -------------  -------------  --------------  ------------  ------------  --------
vmk0  192.168.71.94  255.255.255.0  192.168.71.255  DHCP          192.168.71.1      true
[root@ESXi-X9SRI-3F:/] network ip interface ipv6 get
Name  IPv6 Enabled  DHCPv6 Enabled  Router Adv Enabled  DHCP DNS  Gateway
----  ------------  --------------  ------------------  --------  -------
vmk0          true           false                true     false  ::

If the box has IPv6 configured, the last command would have shown the IPv6 vmdk information as well.

–jeroen

Posted in ESXi5, ESXi5.1, ESXi5.5, ESXi6, ESXi6.5, ESXi6.7, Power User, Virtualization, VMware, VMware ESXi | Leave a Comment »

VMware VMRC: connect to a remote console without the vSphere Client

Posted by jpluimers on 2021/06/21

Interesting tool: https://www.vmware.com/go/download-vmrc.

Back when scheduling this post in 2019, this was the most recent version: [WayBack] Download VMware vSphere: Download VMware Remote Console 10.0.4

From [WayBack] ovf – How to connect ESXi vm console from ESXi host console – Stack Overflow:

Example of vmrc.exe command :

"C:\Program Files (x86)\VMware\VMware Remote Console\vmrc.exe" vmrc://<ESXi host username>@<ESXi host IP>/?moid=<VM ID>

Basically it uses the vmrc scheme to start a connection to the remote screen for a specific MoRef ID. On ESXi, this is actually the VM ID that you get from vim-cmd vmsvc/getallvms. In that sense this is very similar to getting a single screenshot for the VM from the ESXi host by using the https://%5BHOST%5D:%5BPORT%5D/?id=%5BVM-MOREF%5D like described in ESXi and VMware Workstation: quick way of getting Console screenshots in PNG format; some URLs on your ESXi machine.


In MacOS, starting VMware Remote Console is slightly different as you have to start it through a URI using using the vmrc scheme from either a browser or with the open command on the console.

The reason is that there is no vmrc binary on MacOS.

  • [WayBack] Using VMware’s Standalone Remote Console for OS X with free ESXi | Der Flounder:

    vmrc://@[HOST]:[PORT]/?moid=[VM-MOREF]

    • HOST = the hostname or IP address of the ESXi server
    • PORT = the HTTPS port of the ESXi server, which is usually 443

    open 'vmrc://@server_name_here:port_number_here/?moid=vmid_number_here'

  • [WayBack] Standalone VMRC now available for Mac OS X:

    just provide the following URI which will prompt for your ESXi credentials

    vmrc://@[HOST]:[PORT]/?moid=[VM-MOREF]

    Once you have generated the VMRC URI, you MUST launch it through a web browser as that is how it is passed directly to the Standalone VMRC application. In my opinion, this is not ideal especially for customers who wish to automatically generate this as part of a VM provisioning workflow to their end users and not having to require a browser to launch the Standalone VMRC application. If you have some feedback on this, please do leave a comment.

    In the mean time, a quick workaround is to use the “open” command on Mac OS X along with the VMRC URI which will automatically load it into your default browser and launch the Standalone VMRC application for you.

    open 'vmrc://@192.168.1.60:443/?moid=vm-18'

On one of my test systems, for VMID 3 (see below), this comes down to this:

open 'vmrc://@192.168.71.94:443/?moid=3'

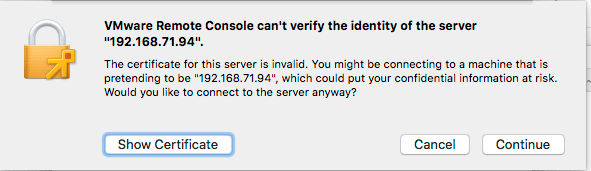
Note you have to accept the ESXi self generated TLS certificate once on MacOS:
After this, these processes were started (note there is no vmrc like on Windows):

± ps -ax | grep -i "\(vmware\|vmrc\)"
65239 ?? 0:04.15 /Applications/VMware Remote Console.app/Contents/MacOS/VMware Remote Console
65343 ?? 0:00.01 /Applications/VMware Remote Console.app/Contents/Library/services/VMRC Services 3 4
65360 ?? 0:00.16 /Applications/VMware Remote Console.app/Contents/Library/vmware-usbarbitrator
65363 ?? 0:00.01 /Applications/VMware Remote Console.app/Contents/Library/services/VMware USB Arbitrator Service 3 4
65393 ?? 0:01.29 /Applications/VMware Remote Console.app/Contents/Library/vmware-remotemks -@ vmdbPipeHandle=42; vm=_7FD2A461E8E0_3; gui=true -H 44 -R -P 2 -# product=256;name=VMware Remote Console;version=10.0.1;buildnumber=5898794;licensename=VMware Remote Console;licenseversion=10.0; -s libdir=/dev/null/Non-existing DEFAULT_LIBDIRECTORY
65872 ttys001 0:00.00 grep -i \(vmware\|vmrc\)

VM IDs (or VM-MOREFs)

You get the VM IDs using the vim-cmd vmsvc/getallvms command; they appear in the left column:

[root@ESXi-X9SRI-3F:/] vim-cmd vmsvc/getallvms
Vmid         Name                                 File                               Guest OS       Version   Annotation
1      Lampje             [EVO860_250GB] Lampje/Lampje.vmx                       opensuse64Guest    vmx-14              
3      X9SRI-3F-W10P-NL   [EVO860_250GB] X9SRI-3F-W10P-NL/X9SRI-3F-W10P-NL.vmx   windows9_64Guest   vmx-14    

Note that in practice, this is much harder so I wrote a script for that which you can find in VMware ESXi console: viewing all VMs, suspending and waking them up: part 1.

bundle files

I did not know about bundle files, but they seem to be sh scripts that precede a binary: [WayBack] What is a .bundle file and how do I run it? – Super User.

Inspecting such a files, shows it starts with this code:

#!/usr/bin/env bash
#
# VMware Installer Launcher
#
# This is the executable stub to check if the VMware Installer Service
# is installed and if so, launch it.  If it is not installed, the
# attached payload is extracted, the VMIS is installed, and the VMIS
# is launched to install the bundle as normal.

# Architecture this bundle was built for (x86 or x64)
ARCH=x64

if [ -z "$BASH" ]; then
   # $- expands to the current options so things like -x get passed through
   if [ ! -z "$-" ]; then
      opts="-$-"
   fi

   # dash flips out of $opts is quoted, so don't.
   exec /usr/bin/env bash $opts "$0" "$@"
   echo "Unable to restart with bash shell"
   exit 1
fi

–jeroen

Posted in Apple, ESXi6, ESXi6.5, ESXi6.7, Mac OS X / OS X / MacOS, macOS 10.12 Sierra, macOS 10.13 High Sierra, Power User, Virtualization, VMware, VMware ESXi, Windows, Windows 10, Windows 7, Windows 8, Windows 8.1 | Leave a Comment »

CloudKey ESXi Appliance – Google Search

Posted by jpluimers on 2021/06/07

Via [Archive.is] CloudKey ESXi Appliance – Google Search:

–jeroen

Posted in *nix, Cloud Key, ESXi6, ESXi6.5, ESXi6.7, Internet, Network-and-equipment, Power User, Unifi-Ubiquiti, Virtualization, VMware, VMware ESXi | Leave a Comment »

Downloading files with wget on ESXi · random writes

Posted by jpluimers on 2021/05/31

Reminder to self to check if wget on ESXi now finally supports https downloading: [WayBack] Downloading files with wget on ESXi · random writes.

In the mean time, ESXi 6.7 Update 2 and up seems to support this; so the below workaround might only be needed for ESXi 6.7 update 1 and below.

[WayBack] VMware ESXi: help downloading large ISO – Server Fault

I will likely not do this, as by now all my ESXi boxes should have been recent enough.

I will keep the article because of the BusyBox commands section below.

If so, I might finally try and write a Python wrapper for this, as I know that Python 3 on ESXi supports https, but the ESXi BusyBox does not have a built-in cURL.

Some links and notes I might need by then:

BusyBox commands

Another cool thing in the above blog post is that it shows how to dump the BusyBox built in commands.

I ran it for ESXi 6.7 with a slight trick to get the full path (using back-ticks and escaped back-ticks) and content.

Since ESXi is BusyBox based, the commands that are in /bin are not actually binaries, but each command is a symlink to the BusyBox binary. BusyBox then knows the original name of the command, so it can deduct what part to execute. This makes for a very space efficient storage scheme.

The various bits of the tricks to get the location of the BusyBox binary, so the --list parameter can be passed to it:

  • The which wget gives the full path of wget.
  • The ls -l `which wget` shows the full path of wget and the symlink target (but there is no way for ls to only show the symlink target).
  • The readlink -f `which wget` shows the full path of where /bin/wget points to: the BusyBox binary.

The main trick consists of backtick evalution, and knowing that ls cannot get you just the symlink target, but readlink can:

Now the back-tick escapes, because you cannot nest back-ticks:

  • The `readlink -f \`which wget\`` executes the BusyBox binary without arguments.
  • The `readlink -f \`which wget\`` --list executes the BusyBox binary with the --list parameter.

Note I do not like the cat --help (see [WayBack] How do I check busybox version (from busybox)? – Unix & Linux Stack Exchange) way of getting the BusyBox version, as that gets echoed to stderr.

This is the output:

Read the rest of this entry »

Posted in *nix, *nix-tools, cURL, ESXi6, ESXi6.5, ESXi6.7, Power User, Virtualization, VMware ESXi, wget | Leave a Comment »

How to Copy files between ESXi hosts using SCP Command

Posted by jpluimers on 2021/05/21

Derived the bits below from [WayBack] How to Copy files between ESXi hosts using SCP Command.

Recursive copy from a remote machine to an existing local directory:

scp -rp root@192.168.71.97://vmfs/volumes/EVO860_500GB/VM1/ /vmfs/volumes/EVO860_250GB/VM2/

After this you need to edit the .vmxf files in the VM2 directory to ensure these are not duplicates.

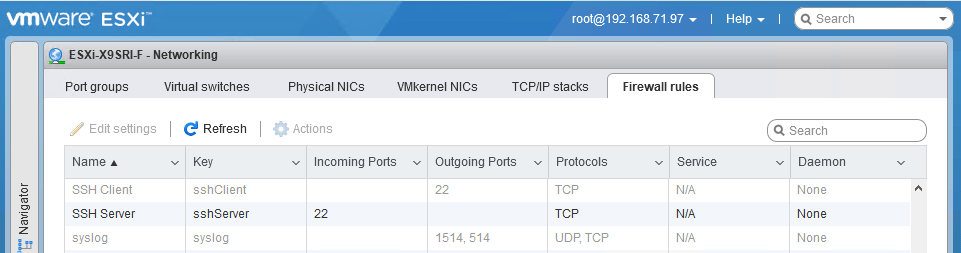
One thing to remember is that you need the current host to allow the SSH client in the firewall, which is disabled by default:

After enabling:

Be really careful with the -3 option to scp; it allows you to transfer from one remote machine to another remote machine, but when using keyboard-interactive, you have a high change to lock-out your accounts: SSH will try to keyboard-interactive to both hosts at the same time.

If you lock-out root, then you have to go through the local DCUI console (use ALT-F2 to go there), then reset the root account failure count using pam_tally2 --user root --reset.

So this can be bad:

scp -3 -rp root@192.168.71.97://vmfs/volumes/EVO860_500GB/VM1/ root@192.168.71.91://vmfs/volumes/EVO860_250GB/VM2/

This works, but assumes the SSH client is enabled from the first host:

scp -rp root@192.168.71.97://vmfs/volumes/EVO860_500GB/VM1/ root@192.168.71.91://vmfs/volumes/EVO860_250GB/VM2/

See these links:


[root@ESXi-X9SRI-F:~] esxcli network firewall get
   Default Action: DROP
   Enabled: true
   Loaded: true
[root@ESXi-X9SRI-F:~] esxcli network firewall ruleset list --ruleset-id sshClient
Name       Enabled
---------  -------
sshClient    false
[root@ESXi-X9SRI-F:~] esxcli network firewall ruleset set --ruleset-id sshClient --enabled true
[root@ESXi-X9SRI-F:~] esxcli network firewall ruleset list --ruleset-id sshClient
Name       Enabled
---------  -------
sshClient     true
[root@ESXi-X9SRI-F:~] esxcli network firewall ruleset set --ruleset-id sshClient --enabled false
[root@ESXi-X9SRI-F:~] esxcli network firewall ruleset list --ruleset-id sshClient
Name       Enabled
---------  -------
sshClient    false

–jeroen

Posted in *nix, *nix-tools, ESXi6, ESXi6.5, ESXi6.7, Power User, ssh/sshd, Virtualization, VMware, VMware ESXi | Leave a Comment »

ESXi 6.x download URL

Posted by jpluimers on 2021/05/17

Many of the ESXi download URLs get you to my-vmware in places that indicate you do not have a license.

This seems to be the only link that consistently gets you the license and downloads: my.vmware.com/en/group/vmware/evalcenter?p=free-esxi6.

For instance, the ones below with

–jeroen

Posted in ESXi6, ESXi6.5, ESXi6.7, Power User, Virtualization, VMware, VMware ESXi | Leave a Comment »