
After this Windows 10 boot screen the display goes blank without a mouse cursor.
So you upgraded your X201 from Windows 7 to Windows 10 even though it’s not in the listed on the Lenovo supported models page.
Now it gets through the boot screen, flashes the CapsLock/NumLock LEDS, blanks the screen (no mouse cursor) and continues booting without any visual feedback apart from the HDD LED flashing until it is finished booting
Since Windows 10 by default does not enable the F8 option any more, you need some more severe measures.
BIOS update
The first was to get the BIOS up to date. At the time of writing that was 1.40-1.15 from BIOS Update Bootable CD for Windows 8 (32-bit, 64-bit), 7 (32-bit, 64-bit), Vista (32-bit, 64-bit), XP – ThinkPad – Lenovo Support (US):
Then I had to burn the ISO. Which was a bit picky because most of my infrastructure is VM based and none of the physical machines had a DVD or CD-drive any more. Luckily I found a LiteOn SLW 831SX which Windows detects as Slimtype DVDRW SLW-831S USB Device. ImgBurn worked with that (elevated to Administrative mode that is: it requires that both for burning and grabbing an ISO image).
Upgrading the BIOS went fine, but the symptoms stayed.
Removing/re-inserting battery
Removing the battery for a while, then reinserting was suggested at one of the sites. It didn’t help.
Force into Repair Mode
Then I read this:
If the system can’t load the necessary configuration more than two times, the system will direct the display to Windows RE(Recovery environment).
Source: Windows 10 – How to enter Safe Mode if I can’t boot the system successfully?
They also have: Windows 10 – If I can’t enter the system, how can I restore the Windows 10 laptop or PC to default settings?
This very easy to do:

Prepairing Automatic Repair
- Keep the power button down to power off the machine
- Power up the machine
- Wait for the boot screen to appear, then
- Keep the power button down to power off the machine
- Power up the machine
- Wait for the boot screen to appear, then
- Keep the power button down to power off the machine
- Wait for the “Prepairing Automatic Repair” to finish
- Wait for the “Diagnosing your PC” to finish
- Wait for the “Automatic Repair” to appear, then
- Wiggle with the mouse to get a mouse cursor
- Press the “Advanced Options” button
- Choose “Troubleshoot”
- Choose “Advanced Options”
- Choose “Startup Settings”
- Choose “Restart”
- Wait for the reboot and “Startup Settings” to appear (note: no mouse cursor)
- Hit F5 for “Enable Safe Mode with Networking”
- Wait for it to reboot twice.
This didn’t work as well as I hoped as now I was at the failure point as well.
But now at least I had a starting point to trip Windows into booting any way I wanted. I now only had to find which function key would get me into a state where I could see what was going on.
And the good things: The “Diagnosing your PC” only required one ‘manual power down” to appear.
- F9 – Disable automatic restart after failure
- F8 – Disable early launch anti-malware protection
- F7 – Disable driver signature enforcement
- F6 – Enable Safe Mode with Command Prompt
- F5 – Enable Safe Mode with Networking
- F4 – Enable Safe Mode
- F3 – Enable low-resolution video
- F2 – Enable boot logging
- F1 – Enable debugging
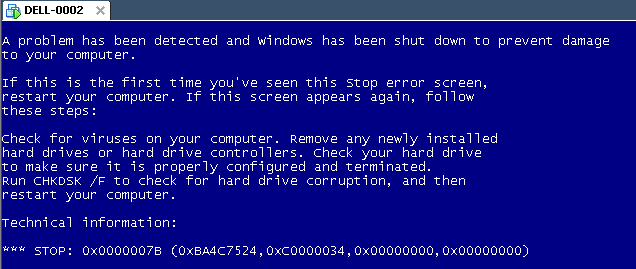
F3 finally got me to the VIDEO_DRIVER_INIT_FAILURE (BSOD STOP 0x000000B4) which indicated the machine was so hosed that I had to to a clean install.
–jeroen
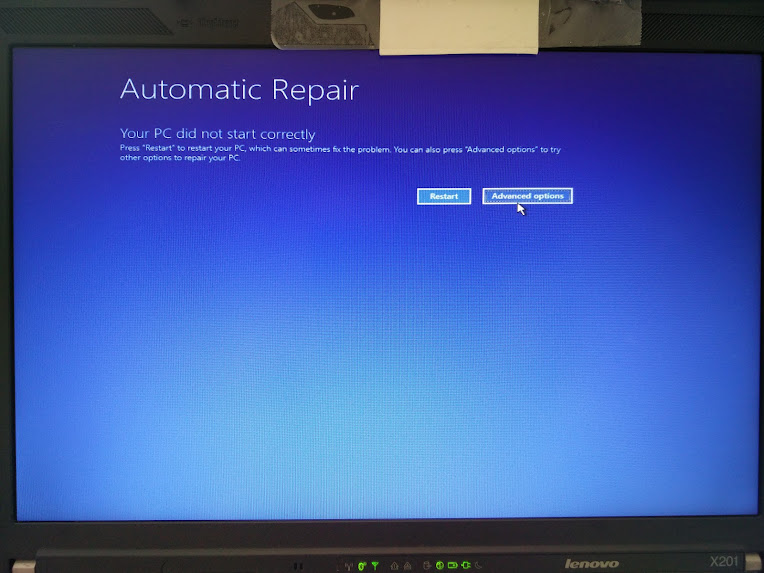
Automatic Repair – wiggle with the mouse and you have a cursor too!
–jeroen
Images via:


