For my link archive: [WayBack] Forced routing of selective emails to ISP SMTP via Mikrotik Routing | Syed Jahanzaib Personal Blog to Share Knowledge !
–jeroen
Posted by jpluimers on 2021/01/14
For my link archive: [WayBack] Forced routing of selective emails to ISP SMTP via Mikrotik Routing | Syed Jahanzaib Personal Blog to Share Knowledge !
–jeroen

Posted in Development, MikroTik, Power User, RouterOS, routers, Scripting, Software Development | Leave a Comment »
Posted by jpluimers on 2021/01/08
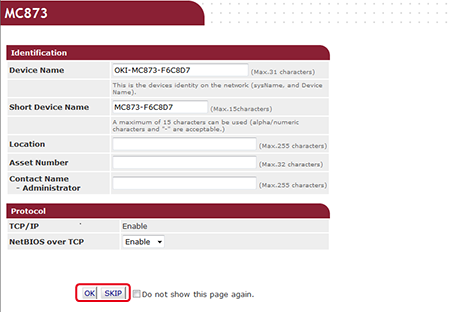 I’ve found out that the only way to reset the below fields on an OKI printer is to
admin which has default password 999999, on an OKI MC342 the password is aaaaaa)Image source: [Archive.cs] Checking or Changing the Settings of This Machine from a Computer (MC853, MC873)
–jeroen

Posted in OKI C332, OKI Printers, Power User, Printers | Leave a Comment »
Posted by jpluimers on 2021/01/07
Similar to the CAT# designation for speed categories, fiber cables have an OM# designation. [WayBack] OM1 fiber, OM2 fiber, OM3 fiber and OM4 fiber overview explain this well, and has this quote and image tables:
There are four kinds of multimode fibers: OM1 fiber, OM2 fiber, OM3 fiber and OM4 fiber. The letters “OM” stand for optical multi-mode.
Both OM1 and OM2 work with LED based equipment that can send hundreds of modes of light down the cable, while OM3 and OM4 are optimized for laser (eg. VCSEL) based equipment.
I have combined the tables in html as:
OM1 OM2 OM3 OM4 Maximum distance for 100 Mbit/s 2000m 2000m 2000m 2000m 100BASE -FX Maximum distance for 1 Gbit/s 275m 550m 550m 1000m 1000BASE-SX Maximum distance for 10 Gbit/s 33m 82m 300m 550m 10GBASE-SR Maximum distance for 40 Gbit/s not specified not specified 100m 150m 40GBASE-SR4 Maximum distance for 100 Gbit/s not specified not specified 100m 150m 100GBASE-SR10 / 100GBASE-SR4 Diameter 62.5/125µm 50/125µm 50/125µm 50/125µm Jacket coulors (often also cable colours) Orange Orange Aqua Aqua Optical source LED LED VCSEL VCSEL Bandwidth 200MHz*km 500MHz*km 2000MHz*km 4700MHz*km
Unlike CAT cabling, fiber cables can have various connectors, of which SC and LC are the most common as explained in [WayBack] SC vs LC—What’s the difference? which has this quote and image table:
- Size: LC is half the size of SC. Actually, one SC-adapter is exactly the same size as a duplex LC-adapter. Therefore LC is more and more common in central offices where packing density (number of connections per area) is an important cost factor
- Handling: SC is a true “push-pull-connector” and LC is a “latched connector”, although there are very innovative, real “push-pull-LCs” available which have the same handling capabilities like SC.
- The History of Connector: The LC is the “younger” connector of the two, SC is wider spread around the world but LC is catching up. Both connectors have the same insertion loss and return loss capabilities. Generally, it depends where in the network you want to use the connector, no matter SC or LC, even the other different kinds of connector.
In html:
Name Mating
cyclesFerrule
sizeTypical
insertion loss
(dB)IEC
specificationCost Ease
of
useApplication
featuresSC 1000 Ø 2.5mm
ceramic0.25-0.5 61754-4 $$ ••••• Mainstream, reliable, fast deployment, field fit LC 500 Ø 1.25mm
ceramic0.25-0.5 61754-20 $$ ••••◦ High density, cost effective, field fit
Related:
–jeroen

Posted in Ethernet, Network-and-equipment, Power User | Leave a Comment »
Posted by jpluimers on 2021/01/06
 Every time my scan VM logs on I get the dialog on the right.
Every time I finish an OCR scan, I get the dialog below.
There are two reasons I want to close the ABBY dialog:
I do not want to fully get rid of these dialogs, as often being aware of the progress is important, and I always forget how to re-enable things. If you can do without the dialogs, then try these:
I did use one nice feature of AutoHotKey: their Windows Spy utility, which is implemented as a AHK script: [WayBack] AutoHotKey-scripts/WindowSpy.ahk at master · elig0n/AutoHotKey-scripts · GitHub. In the past this was a separate executable, so do not start looking for that any more. You can get it either after a full install of the [WayBack] Releases · Lexikos/AutoHotkey_L · GitHub, or by extracting from the most current AutoHotKey.zip from [Archive.is] AutoHotkey Downloads.
Related:
- [WayBack] Changes & New Features | AutoHotkey
1.1.27.00 – December 25, 2017
Changes:
Replaced AU3_Spy.exe with WindowSpy.ahk.
…
- [WayBack] autohotkey – What is AU3_Spy.exe? Where can I find it? – Stack Overflow
- Search for
Spyin
This gets these for the Create Cloud and ABBY windows:
I contemplated about using AutoIt (freeware, but closed source) or AutoHotKey_L (the current active fork of AutoHotKey).
AutoIt is now closed source, forked in the past as AutoHotKey, which has a lot of half backed – usually poorly documented – scripts needing you to learn a new API wrapper around existing Windows API functionality.
So I reverted back to using the Windows API using Delphi: a simple repeat loop, to check for the existence of the underlying processes, windows and controls, plus some logic to terminate then the user stops the application (Ctrl-C, Ctrl-Break), logs off, or Windows shuts down.
Releated Windows API keywords and posts:
SetConsoleCtrlHandler and HandlerRoutine parameter dwCtrlType values CTRL_C_EVENT, CTRL_BREAK_EVENT, CTRL_CLOSE_EVENT, CTRL_LOGOFF_EVENT and CTRL_SHUTDOWN_EVENT.
HandlerRoutine is called in a separate thread, implying you should be very careful with what you do. Best is to only set some flags. Worst is to go GUI handling (DO NOT CALL ShowMessage HERE!)SetConsoleCtrlHandler for console applications, the service related RegisterServiceCtrlHandler and RegisterServiceCtrlHandlerEx calls and the Windows messages to watch for GUI applications: WM_QUERYENDSESSION and WM_POWERBROADCAST.
I could have used AutoHotKey with these hints to get it working:
Note that when you run on MacOS, you need an alternative like for instance the video below shows via [WayBack] Stop ScanSnap From Prompting You When You Scan.
–jeroen

Posted in Development, Fujitsu ScanSnap, Hardware, ix100, ix500, Power User, Scanners, Scripting, Software Development, Windows, Windows 10, Windows 8.1 | Leave a Comment »
Posted by jpluimers on 2020/12/24
 For my link archive (this DIN rail device allow sensing current used by a circuit; models for 5A/20A/30A).
Thanks Matthijs ter Woord for pointing me to this.
Schematics show it uses an LM317 linear voltage regulator (to get 5V out of a 8V-35V range) next to the ACS712 current sensor (based on the [WayBack] Hall effect) available in 5A, 20A and 30A varieties.
Documentation:
Schematics:

Posted in Development, Hardware, Hardware Development, Hardware Interfacing | Leave a Comment »
Posted by jpluimers on 2020/11/04
Multi-WAN routing always involves marking incoming connections to the replies go out on the same connection: [WayBack] Mikrotik Remote Access via Multiple WAN Links | Syed Jahanzaib Personal Blog to Share Knowledge !
# Mirkotik IP Firewall Mangle Section/ ip firewall mangle# Mark traffic coming via WAN-1 linkadd chain=input in-interface=WAN1 action=mark-connection new-connection-mark=WAN1_incoming_conn# Mark traffic coming via WAN-2 linkadd chain=input in-interface=WAN2 action=mark-connection new-connection-mark=WAN2_incoming_conn# Mark traffic routing mark for above marked connection for WAN-1 , so that mikrotik will return traffic via same interface it came inadd chain=output connection-mark=WAN1_incoming_conn action=mark-routing new-routing-mark=to_WAN1# Mark traffic routing mark for above marked connection for WAN-2, so that mikrotik will return traffic via same interface it came inadd chain=output connection-mark=WAN2_incoming_conn action=mark-routing new-routing-mark=to_WAN2# Finally Add appropriate routes in ROUTE section/ ip routeadd dst-address=0.0.0.0/0 gateway=1.1.1.2 routing-mark=to_WAN1 check-gateway=pingadd dst-address=0.0.0.0/0 gateway=2.2.2.2 routing-mark=to_WAN2 check-gateway=ping
Related:
–jeroen
Posted in Development, Internet, MikroTik, Power User, RouterOS, routers, Scripting, Software Development | Leave a Comment »
Posted by jpluimers on 2020/10/30
I hate applications that globally install Windows shortcut keys without the setup/install either warn about it or make it configurable.
In this case it is about CardMinder Viewer that ships with the Fujitsu ix500 scanner and installs a global shortcut, by default Alt-F3.
CardMinder Viewer is especially bad because the “settings” are not in the application: the settings are part of the Windows notification area (usually on the lower left of your screen; many people call it “the tray” as it was called tray in the Cairo research that led to Windows 95 and Windows NT 3.5).
So here is how to get rid of the Alt–F3 shortcut to be stolen:

Posted in Fujitsu ScanSnap, Hardware, ix500, Power User, Scanners, Windows | Leave a Comment »
Posted by jpluimers on 2020/09/28
Saving an initial configuration without changing anything gives these errors:
If you are OK with self-signed certificates, then the first is solved by using this as the Server certificate:
The second needs an additional step: you have to select or create a certificate authority first at hostname/system_camanager.php?act=new where hostname is the hostname or IP address of your pfSense configuration.
This order is actually explained in [WayBack] OpenVPN – The Open Source VPN: HOWTO and [WayBack] OpenVPN Configuration (pfSense) – ELITS, but I like stronger security.
For the Internal Certificate Authority (CA), use at least these settings:
2048 bits, but I prefer 3072 bits (to be safe after about 2030) as per
sha256, but I prefer sha512 as it will be safe for a longer period of time.3650 (10 years); can you keep your VM safe for that long? If longer, you can increase the lifetime, but also have to ensure you take large enough values for the Key length and Digest Algorithm.You can view the possible settings in [WayBack] pfsense/system_camanager.php at master · pfsense/pfsense · GitHub.
Use a TLS Key
TLS Key
TLS Key Usage Mode
Peer Certificate Authority
Peer Certificate Revocation list
Use a TLS Key
Use a TLS Key
ECDH Curve
Hardware Crypto
RDRAND instruction is available, this choice allows to use it. I think OpenVPN (via OpenSSL) on BSD uses this in a similar way as Linux: i.e. not as the only source for randomness. See [WayBack] Torvalds shoots down call to yank ‘backdoored’ Intel RdRand in Linux crypto • The Register/usr/bin/openssl engine -t -c command:
DH Parameter Length
This means they can potentially be re-used as an attack-vector, so you need to manually re-generate them as per [WayBack] DH Parameters – pfSense Documentation by using /usr/bin/openssl dhparam
In order to speed that up, you have to either manually add a lot of entropy, or ensure your VM uses the host entropy by installing the open-vm-tools and rebooting.
This can take quite some time as it depends on /dev/random as a pure random number source, which will wait if there is not enough initial entropy available yet (see [WayBack] prng – differences between random and urandom – Stack Overflow).
In order to speed that up, you have to either manually add a lot of entropy, or ensure your VM uses the host entropy by installing the open-vm-tools and rebooting.
On a single-coreIntel(R) Xeon(R) CPU E5-2630L v4 @ 1.80GHz, the timings of these
/usr/bin/openssl dhparam -out /etc/dh-parameters.1024 1024

/usr/bin/openssl dhparam -out /etc/dh-parameters.2048 2048

/usr/bin/openssl dhparam -out /etc/dh-parameters.4096 4096
using the [WayBack] FreeBSD Manual Pages: time command are (each measured twice):
4096Encryption Algorithm
AES.AES-256-GCM (256 bit key, 128 bit block)
AES-128-GCM.Enable NCP(Negotiable Cryptographic Parameters)
NCP Algorithms

AES-256-GCMAES-192-GCMAES-128-GCMAuth digest algorithm
SHA512 (which I use) or SHA256 is fine. Do not use SHA1 unless you need backward compatibility with pre 2.4 OpenVPN installations or pre-configured clients. See [WayBack] How safe to change default SHA1 to other encryption algorithm?Certificate depth
All networks are in CIDR notation, like 192.168.3.0/24.
IPv4 Tunnel network
172.x.y.0 networks as they are far less used than 192.168.x.0 and 10.x.y.0 networks. Note that some networks starting with 172 are in public use, so limit yourself to 172.16.0.0 – 172.31.255.255.IPv6 Tunnel network
IPv4 Local networks
IPv4 Remote networks
IPv4 Remote networks
Concurrent connections
Compression
compression lz4 or compression lz4-v2 in the future.Push compression
Type-of-Service
Inter-client communication
Duplicate Connection
Dynamic IP
Topology: choose subnet (use net30 only for old 2.0.9 client compatibility on Windows; use p2p if you only have non-Windows clients)Advanced client options
Custom options
UDP Fast I/O
Send/Receive Buffer
Gateway creation
BothVerbosity level
Even if the underlying Intel/AMD processor supports AES, it is not enabled by default in pfSense as per web UI home page:
Intel(R) Xeon(R) CPU E5-2630L v4 @ 1.80GHz
AES-NI CPU Crypto: Yes (inactive)
I was quite surprised, but then remembered that enabling RDRAND in the OpenVPN settings was also non-default and dug a bit deeper into ….
There I found you have to go to the System menu, choose Advanced, then the Miscellaneous tab:
From there, browse down (or search for Hardware) to “Cryptographic & Thermal Hardware”, then enable the CPU based accelleration:
After pressing the Save button at the bottom, you are done:
AES-NI CPU Crypto: Yes (active)
I got this via [WayBack] AES-IN Inactive?, which also mentions this:
- AES-NI loads aesni.ko
- BSD Crypto loads cryptodev.ko
- AES-NI and BSD Crypto loads both
Note that AES – as of FreeBSD-10 – AES-NI and other hardware implementations are only indirectly incorporated into /dev/random. The Linux kernel already did this in an indirect way. I think that is a good idea as when multiple entropy sources are merged together, it makes it much harder to influence to total entropy. FreeBSD implemented this using the Yarrow algorithm – Wikipedia and now has moved to a successor, the Fortuna (PRNG) – Wikipedia.
More background information:
Note there is a message about ACE support on the console and in the boot log that is related to AES:
padlock0: No ACE support.
aesni0: <AES-CBC, AES-XTS, AES-GCM, AES-ICM> on motherboard
The cause is that in the past, VIA PadLock Advanced Cryptography Engine (ACE) in the mid 2000s introduced encryption acceleration (see [WayBack] VIA PadLock support for Linux) a few years before AES-NI, so ACE is incompatible with AES-NI. AES-NI is now much more widespread than ACE, even the wikipedia VIA page padlock information has been removed.
An odd thing: unlike AES-NI which needs to be specifically enabled, VIA Padlock is always enabled, see
Ensure you install the (optional, but highly recommended) [WayBack] OpenVPN Client Export Package:
Allows a pre-configured OpenVPN Windows Client or Mac OS X’s Viscosity configuration bundle to be exported directly from pfSense.
These config files work with Tunnelblick as well, which is a great free and open source OpenVPN tool on Mac OS X / MacOS:
I have yet to cover these two; for now read [WayBack] How to setup OpenVPN on pFSense? | IT Blog and [WayBack] OpenVPN Remote Access Server – pfSense Documentation.
I like this overview a lot:
–jeroen

Posted in Internet, pfSense, routers | Leave a Comment »
Posted by jpluimers on 2020/09/25
If during a pfSense reboot you get one or more messages from syslog about “operation not supported by device” on various log files, then they are likely corrupt.
I had this when a pfSense 2.4.x RELEASE version VM was accidentally power-cycled during initial setup.
A side effect was that no logs showed in the web UI either, nor would clog on any file in the /var/log directory.
The solution was to choose option 8 (Shell), then in the /var/log directory, remove all files with extension .log, then reboot.
Now the messages were gone and the web UI showed logs. clog /var/log/system.log showed content as well.
Solution based on these posts:
–jeroen
Posted in Internet, pfSense, Power User, routers | Leave a Comment »
Posted by jpluimers on 2020/09/14
I needed to get myself an OOB license for the BIOS update over the IPMI console or SUM (Supermicro Update Manager). An IPMI update can be done without an OOB license from the IPMI console, but the BIOS requires a license.
Links that initially helped me with that to get a feel for what I needed:
I thought that likely I need to purchase a key for it:
But then I found out the below links on reverse engineering.
From those links, I checked both the Perl and Linux OpenSSL versions. Only the Perl version works on MacOS.
Then I fiddled with the bash version: unlike the OpenSSL version above, this one printed output. It wrongly printed the last groups of hex digits instead of the first groups of hex digits that the Perl script prints.
Here is the corrected bash script printing the first groups of hex digits (on my systems, I have an alias supermicro_hash_IPMI_BMC_MAC_address_to_get_OOB_license_for_BIOS_update for it):
#!/bin/bash
function hash_mac {
  mac="$1"
  key="8544e3b47eca58f9583043f8"
  sub="\x"
  #convert mac to hex
  hexmac="\x${mac//:/$sub}"
  #create hash
  code=$(printf "$hexmac" | openssl dgst -sha1 -mac HMAC -macopt hexkey:"$key")
  #DEBUG
  echo "$mac"
  echo "$hexmac"
  echo "$code"

  echo "${code:0:4}-${code:4:4}-${code:8:4}-${code:12:4}-${code:16:4}-${code:20:4}"
}
Another way to update the BIOS via the Supermicro IPMI for free is simply calculating the license key yourself as described here: https://peterkleissner.com/2018/05/27/reverse-engineering-supermicro-ipmi/ [WayBack].
Algorithm:
MAC-SHA1-96(INPUT: MAC address of BMC, SECRET KEY: 85 44 E3 B4 7E CA 58 F9 58 30 43 F8)Update 1/14/2019: The Twitter user @astraleureka posted this code perl code which is generating the license key:
#!/usr/bin/perl
use strict;
use Digest::HMAC_SHA1 'hmac_sha1';
my $key  = "\x85\x44\xe3\xb4\x7e\xca\x58\xf9\x58\x30\x43\xf8";
my $mac  = shift || die 'args: mac-addr (i.e. 00:25:90:cd:26:da)';
my $data = join '', map { chr hex $_ } split ':', $mac;
my $raw  = hmac_sha1($data, $key);
printf "%02lX%02lX-%02lX%02lX-%02lX%02lX-%02lX%02lX-%02lX%02lX-%02lX%02lX\n", (map { ord $_ } split '', $raw);
Update 3/27/2019: There is also Linux shell version that uses openssl:
echo -n 'bmc-mac' | xxd -r -p | openssl dgst -sha1 -mac HMAC -macopt hexkey:8544E3B47ECA58F9583043F8 | awk '{print $2}' | cut -c 1-24
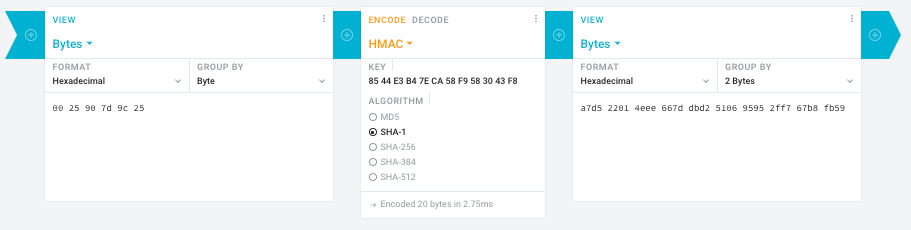
Web app offering modular conversion, encoding and encryption online. Translations are done in the browser without any server interaction. This is an Open Source project, code licensed MIT.
Steps:
00 25 90 7d 9c 25)85 44 E3 B4 7E CA 58 F9 58 30 43 F8a7d5 2201 4eee 667d dbd2 5106 9595 2ff7 67b8 fb59Result:
Ahh…..a few corrections :-P
#!/bin/bash
function hash_mac {
  mac="$1"
  key="8544e3b47eca58f9583043f8"
  sub="\x"
  #convert mac to hex
  hexmac="\x${mac//:/$sub}"
  #create hash
  code=$(printf "$hexmac" | openssl dgst -sha1 -mac HMAC -macopt hexkey:"$key")
  #DEBUG
  echo "$mac"
  echo "$hexmac"
  echo "$code"
  echo "${code:9:4} ${code:13:4} ${code:17:4} ${code:21:4} ${code:25:4} ${code:29:4}"
}
#hex output with input
hash_mac "$1"

#Look out for the quotes, they might get changed by different encoding
Thanks Peter. For anyone interested, here’s a bash script that takes the MAC as the only argument and outputs the activation key:
#!/bin/bash
function hash_mac {
  mac="$1"
  key="8544e3b47eca58f9583043f8"
  sub="\x"
  #convert mac to hex
  hexmac="\x${mac//:/$sub}"
  #create hash
  code=$(printf "$hexmac" | openssl dgst -sha1 -mac HMAC -macopt hexkey:"$key")
  ## DEBUG
  echo "$mac"
  echo "$hexmac"
  echo "$code"
  echo "${code:9:4} ${code:13:4} ${code:17:4} ${code:21:4} ${code:25:4} ${code:29:4}"
}
## hex output with input
hash_mac "$1"
–jeroen

Posted in Development, Encoding, Hardware, Hashing, HMAC, Mainboards, OpenSSL, Power User, Security, SHA, SHA-1, Software Development, SuperMicro, X10SRH-CF | Leave a Comment »